前言
和线性布局(LinearLayout)一样,RelaiveLayout相对布局也是我们用的比较多的一个布局之一
好的编程建议:
合理地利用好LinearLayout的weight权重属性和RelativeLayout相对布局,可以解决屏幕分辨率不同的自适应问题!
相对,顾名思义是有参照的,就是以某个兄弟组件,或者父容器来决定的
比如小明在上学的路上,此时他的位置可以用离家多少米或者是离学校多少米表示,就是利用不同的参照物
记得啊!!!兄弟组件是在一个同一个布局里面的组件,如果是布局里一个组件参照另一个布局里的组件会出错的!!
好了,废话不多说,直接说比较常用的属性吧:
设置布局里面所有组件的对其方式:
android:gravity:设置容器内各个子组件的对齐方式
android:ignoreGravity:如果为哪个组件设置了这个属性的话,那么该组件不受gravity属性的影响
根据父容器来定位:
想位于哪,哪个属性就设置为true
左对齐:android:layout_alighParentLeft
右对齐:android:layout_alighParentRight
顶端对齐:android:layout_alighParentTop
底部对齐:android:layout_alighParentBottom
水平居中:android:layout_centerHorizontal
垂直居中:android:layout_centerVertical
中央位置:android:layout_centerInParent
比较简单,就不给出代码了,画个草图帮助大家了解下
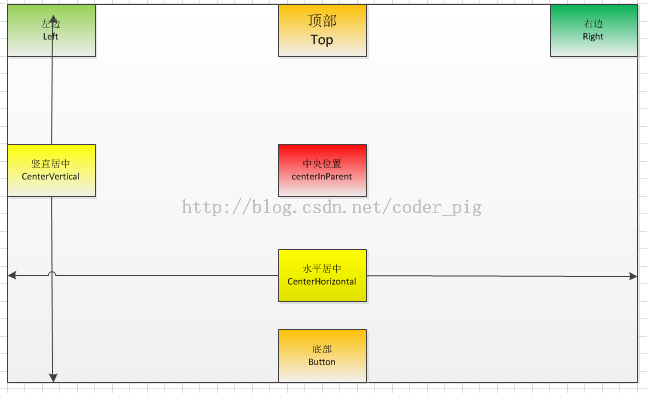
o(╯□╰)o,画工略渣,体谅下,不过大家应该能体会我想表达什么意思的…
根据兄弟组件来定位
右面的属性值为兄弟组件的id
左边:android:layout_toLeftOf
右边:android:layout_toRightOf
上方:android:layout_above
下方:android:layout_below
对齐上边界:android:layout_alignTop
对齐下边界:android:layout_alignBottom
对齐左边界:android:layout_alignLeft
对齐右边界:android:layout_alignRight
这里演示一个比较典型的例子:
梅花布局:
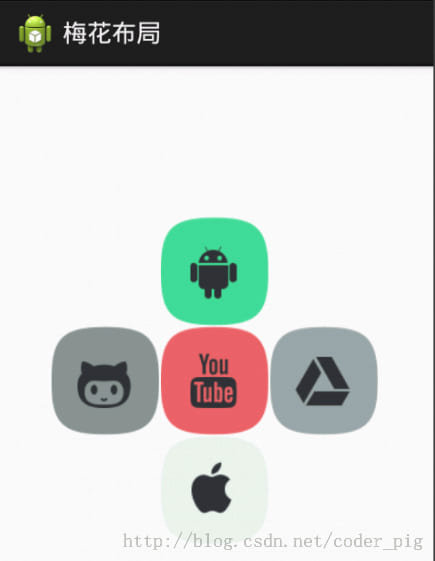
代码如下:
1
2
3
4
5
6
7
8
9
10
11
12
13
14
15
16
17
18
19
20
21
22
23
24
25
26
27
28
29
30
31
32
33
34
35
36
37
38
39
40
41
42
43
44
45
46
47
48
49
50
51
52
53
54
55
56
57
| <RelativeLayout xmlns:android="http://schemas.android.com/apk/res/android"
xmlns:tools="http://schemas.android.com/tools"
android:id="@+id/RelativeLayout1"
android:layout_width="match_parent"
android:layout_height="match_parent" >
<ImageView
android:id="@+id/img1"
android:layout_width="80dp"
android:layout_height="80dp"
android:layout_centerInParent="true"
android:src="@drawable/pic1"
/>
<ImageView
android:id="@+id/img2"
android:layout_width="80dp"
android:layout_height="80dp"
android:layout_toLeftOf="@id/img1"
android:layout_centerVertical="true"
android:src="@drawable/pic2"
/>
<ImageView
android:id="@+id/img3"
android:layout_width="80dp"
android:layout_height="80dp"
android:layout_toRightOf="@id/img1"
android:layout_centerVertical="true"
android:src="@drawable/pic3"
/>
<ImageView
android:id="@+id/img4"
android:layout_width="80dp"
android:layout_height="80dp"
android:layout_above="@id/img1"
android:layout_centerHorizontal="true"
android:src="@drawable/pic4"
/>
<ImageView
android:id="@+id/img5"
android:layout_width="80dp"
android:layout_height="80dp"
android:layout_below="@id/img1"
android:layout_centerHorizontal="true"
android:src="@drawable/pic5"
/>
</RelativeLayout>
|
这个很简单,读者慢慢摸索下就懂了
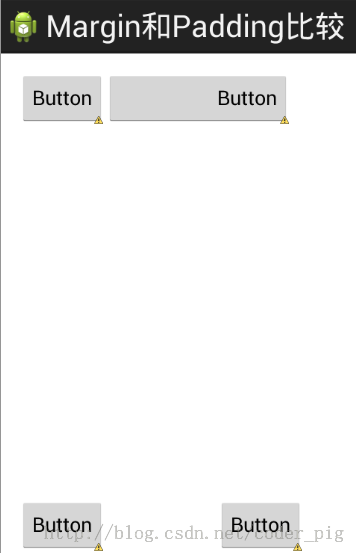
最后还有两个比较常用的
Margin和Padding属性
Margin:设置组件与父容器(通常是布局)的边距
有以下五个
android:layout_margin: 指定控件的四周的外部留出一定的边距
android:layout_marginLeft: 指定控件的左边的外部留出一定的边距
android:layout_marginTop: 指定控件的上边的外部留出一定的边距
android:layout_marginRight: 指定控件的右边的外部留出一定的边距
android:layout_marginBottom: 指定控件的下边的外部留出一定的边距
Padding:设置组件内部元素间的边距(可以理解为填充)
也是有以下五个
android:padding :指定控件的四周的内部留出一定的边距
android:paddingLeft: 指定控件的左边的内部留出一定的边距
android:paddingTop: 指定控件的上边的内部留出一定的边距
android:paddingRight: 指定控件的右边的内部留出一定的边距
android:paddingBottom: 指定控件的下边的内部留出一定的边距
这两个后面都跟着一个参数,通常用dp作为单位,eg:android:margin = "10dp"
用法比较简单,这里就夸张地演示下分别使用两个的效果
效果图如下:
贴下代码:
1
2
3
4
5
6
7
8
9
10
11
12
13
14
15
16
17
18
19
20
21
22
23
24
25
26
27
28
29
30
31
32
33
34
35
36
37
38
39
40
41
42
| <RelativeLayout xmlns:android="http://schemas.android.com/apk/res/android"
xmlns:tools="http://schemas.android.com/tools"
android:layout_width="match_parent"
android:layout_height="match_parent"
android:paddingBottom="@dimen/activity_vertical_margin"
android:paddingLeft="@dimen/activity_horizontal_margin"
android:paddingRight="@dimen/activity_horizontal_margin"
android:paddingTop="@dimen/activity_vertical_margin"
tools:context=".MainActivity" >
<Button
android:id="@+id/btn1"
android:layout_height="wrap_content"
android:layout_width="wrap_content"
android:text="Button"
/>
<Button
android:paddingLeft="100dp"
android:layout_height="wrap_content"
android:layout_width="wrap_content"
android:text="Button"
android:layout_toRightOf="@id/btn1"
/>
<Button
android:id="@+id/btn2"
android:layout_height="wrap_content"
android:layout_width="wrap_content"
android:text="Button"
android:layout_alignParentBottom="true"
/>
<Button
android:layout_marginLeft="100dp"
android:layout_height="wrap_content"
android:layout_width="wrap_content"
android:text="Button"
android:layout_toRightOf="@id/btn2"
android:layout_alignParentBottom="true"
/>
</RelativeLayout>
|
代码解释:
这个代码很简单,就是写了两个按钮的组合,
第一个组合的第二个按钮设置了paddingleft = "100dp,结果按钮被拉伸了100dp,因为里面的元素间距填充了100dp
第二个组合的第二个按钮设置了marginleft = "100dp",结果按钮向右平移了100dp
总结:
以上就是RelativeLayout相对布局的常用属性,如果纰漏
望读者指出,O(∩_∩)O谢谢!
多摸索摸索这些属性就熟悉了!