结合程序和图作出说明:
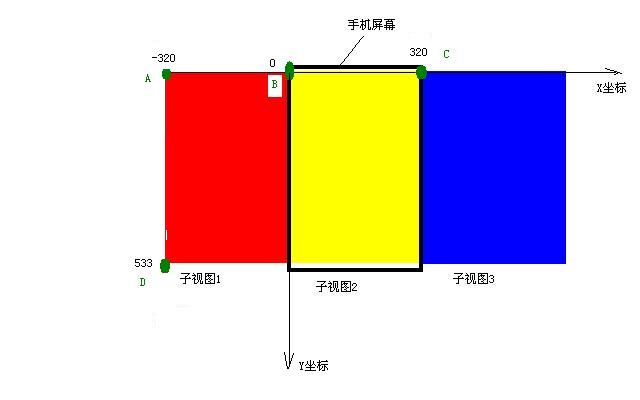
(个人理解:视图的原点为第一次加载的界面的左上角,也就是说A点的坐标是(0,0) )
1、关于自定义视图继承ViewGroup中的onMeasure和onLayout是怎么实现我就不多说了,此博文主要是说明scrollTo、scrollBy、getScrollX、getScrollY这4个方法的含义。
2、整个坐标系是以手机屏幕左上角为原点,子视图的高度应该和手机屏幕高度一样高,但是为了画图显示突出,所以手机屏幕稍微高了一些。
3、MultiViewGroup继承ViewGroup,初始化时包含了3个子视图(子视图1、子视图2、子视图3),并且每个子视图的宽、高都和手机屏幕一样大。MultiViewGroup容器经过onMeasure和onLayout设置后,它的视图坐标应该是3个颜色区域的总大小,这个区域远比我们得手机屏幕大,这点要注意。开始时应该显示的是子视图1(红色区域)。
4、public void scrollTo(int x, int y)说明:
它表示移动到视图的那个坐标点。哪个视图调用这个方法,那么这个视图的(x,y)点就与手机屏幕的左上角对齐(也可以理解为,手机屏幕的左上角就移动到(x,y)坐标)。
public void scrollBy(int dx, int dy) 说明:
它表示在视图的X、Y方向上各移动dx、dy距离
dx>0表示视图(View或ViewGroup)的内容从右向左滑动;反之,从左向右滑动
dy>0表示视图(View或ViewGroup)的内容从下向上滑动;反之,从上向下滑动
getScrollX()说明:
=手机屏幕显示区域左上角x坐标减去MultiViewGroup视图左上角x坐标=320
getScrollY()说明:
=手机屏幕显示区域左上角y坐标减去MultiViewGroup视图左上角y坐标=0(因为子视图的高度和手机屏幕高度一样)
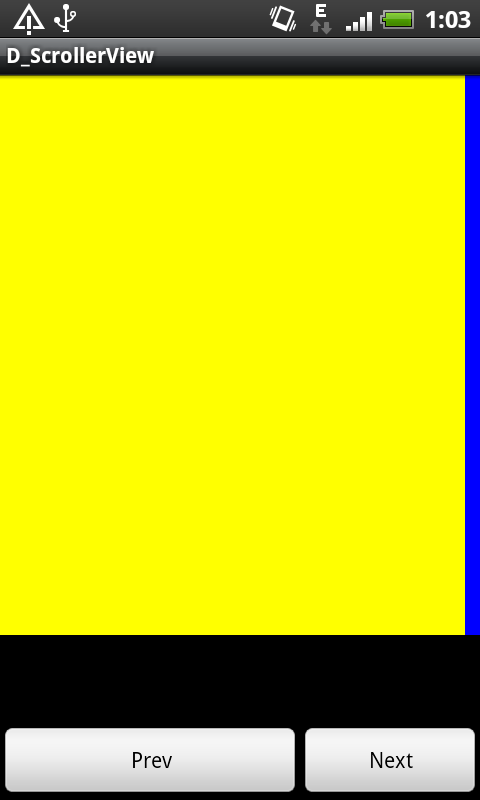
5、当我们点击Next按钮时,执行:
mulTiViewGroup.scrollTo(curscreen* screenWidth, 0);那么程序就移动到了黄色区域
6、点击Prev按钮,执行
mulTiViewGroup.scrollBy(10,200);出现如下图所示
x=10,表示视图从右向左移动了10个单位
y=200,表示视图从下到上移动了200个单位
同时可以调试看看getScrollX()和getScrollY()的值是多少
5、最后,大家自己试试理解一下吧。
下载代码
贴出代码:
multiview.xml
1
2
3
4
5
6
7
8
9
10
11
12
13
14
15
16
17
18
19
20
21
22
23
24
25
26
27
28
| <?xml version="1.0" encoding="utf-8"?>
<RelativeLayout xmlns:android="http://schemas.android.com/apk/res/android"
android:layout_width="fill_parent"
android:layout_height="fill_parent"
android:orientation="vertical" >
<com.qin.scrollerview.MultiViewGroup
android:id="@+id/mymultiViewGroup"
android:layout_width="wrap_content"
android:layout_height="wrap_content" >
</com.qin.scrollerview.MultiViewGroup>
<Button
android:id="@+id/bt_scrollLeft"
android:layout_width="200dip"
android:layout_height="wrap_content"
android:layout_alignParentBottom="true"
android:text="Prev" />
<Button
android:id="@+id/bt_scrollRight"
android:layout_width="200dip"
android:layout_height="wrap_content"
android:layout_alignParentBottom="true"
android:layout_toRightOf="@id/bt_scrollLeft"
android:text="Next" />
</RelativeLayout>
|
MultiViewGroup.java
1
2
3
4
5
6
7
8
9
10
11
12
13
14
15
16
17
18
19
20
21
22
23
24
25
26
27
28
29
30
31
32
33
34
35
36
37
38
39
40
41
42
43
44
45
46
47
48
49
50
51
52
53
54
55
56
57
58
59
60
61
62
63
64
65
66
67
68
69
70
71
72
73
74
75
76
77
78
79
80
81
82
83
84
85
86
87
88
89
90
91
92
93
94
| package com.qin.scrollerview;
import android.app.Activity;
import android.content.Context;
import android.graphics.Color;
import android.os.Bundle;
import android.util.AttributeSet;
import android.util.Log;
import android.view.View;
import android.view.ViewGroup;
import android.view.View.OnClickListener;
import android.widget.Button;
import android.widget.LinearLayout;
import android.widget.TextView;
public class MultiViewGroup extends ViewGroup {
private Context mContext;
private static String TAG = "MultiViewGroup";
public MultiViewGroup(Context context) {
super(context);
mContext = context;
init();
}
public MultiViewGroup(Context context, AttributeSet attrs) {
super(context, attrs);
Log.i(TAG, "MultiViewGroup :getWidth()=" + getWidth()+","+"getHeight()="+getHeight());
mContext = context;
init();
}
private void init() {
LinearLayout oneLL = new LinearLayout(mContext);
oneLL.setBackgroundColor(Color.RED);
addView(oneLL);
LinearLayout twoLL = new LinearLayout(mContext);
twoLL.setBackgroundColor(Color.YELLOW);
addView(twoLL);
LinearLayout threeLL = new LinearLayout(mContext);
threeLL.setBackgroundColor(Color.BLUE);
addView(threeLL);
}
@Override
protected void onMeasure(int widthMeasureSpec, int heightMeasureSpec) {
Log.i(TAG, "--- start onMeasure --");
int width = MeasureSpec.getSize(widthMeasureSpec);
int height = MeasureSpec.getSize(heightMeasureSpec);
setMeasuredDimension(width, height);
int childCount = getChildCount();
Log.i(TAG, "--- onMeasure childCount is -->" + childCount);
Log.i(TAG, "width=" + width+","+"height="+height);
Log.i(TAG, "onMeasure :getWidth()=" + getWidth()+","+"getHeight()="+getHeight());
for (int i = 0; i < childCount; i++) {
View child = getChildAt(i);
child.measure(MultiScreenActivity.screenWidth, MultiScreenActivity.scrrenHeight);
}
}
@Override
protected void onLayout(boolean changed, int l, int t, int r, int b) {
Log.i(TAG, "--- start onLayout --");
int startLeft = 0;
int startTop = 10;
int childCount = getChildCount();
Log.i(TAG, "--- onLayout childCount is -->" + childCount);
Log.i(TAG, "onLayout :getWidth()=" + getWidth()+","+"getHeight()="+getHeight());
for (int i = 0; i < childCount; i++) {
View child = getChildAt(i);
child.layout(startLeft, startTop,
startLeft + MultiScreenActivity.screenWidth,
startTop + MultiScreenActivity.scrrenHeight);
startLeft = startLeft + MultiScreenActivity.screenWidth ;
}
}
}
|
MultiScreenActivity.java
1
2
3
4
5
6
7
8
9
10
11
12
13
14
15
16
17
18
19
20
21
22
23
24
25
26
27
28
29
30
31
32
33
34
35
36
37
38
39
40
41
42
43
44
45
46
47
48
49
50
51
52
53
54
55
56
57
58
59
60
61
62
63
64
65
66
67
68
69
70
71
72
73
74
75
76
77
78
| package com.qin.scrollerview;
import android.app.Activity;
import android.os.Bundle;
import android.util.DisplayMetrics;
import android.view.View;
import android.view.View.OnClickListener;
import android.widget.Button;
import android.widget.TextView;
import android.widget.Toast;
public class MultiScreenActivity extends Activity implements OnClickListener {
private Button bt_scrollLeft;
private Button bt_scrollRight;
private MultiViewGroup mulTiViewGroup ;
public static int screenWidth ;
public static int scrrenHeight ;
private int curscreen = 0;
protected void onCreate(Bundle savedInstanceState) {
super.onCreate(savedInstanceState);
DisplayMetrics metric = new DisplayMetrics();
getWindowManager().getDefaultDisplay().getMetrics(metric);
screenWidth = metric.widthPixels ;
scrrenHeight = metric.heightPixels;
System.out.println("screenWidth * scrrenHeight --->" + screenWidth + " * " +scrrenHeight);
setContentView(R.layout.multiview);
mulTiViewGroup = (MultiViewGroup)findViewById(R.id.mymultiViewGroup);
bt_scrollLeft = (Button) findViewById(R.id.bt_scrollLeft);
bt_scrollRight = (Button) findViewById(R.id.bt_scrollRight);
bt_scrollLeft.setOnClickListener(this);
bt_scrollRight.setOnClickListener(this);
}
@Override
public void onClick(View v) {
switch (v.getId()) {
case R.id.bt_scrollLeft:
if(curscreen > 0) {
curscreen -- ;
Toast.makeText(MultiScreenActivity.this, "第" +(curscreen+1) + "屏", 300).show();
}
else
Toast.makeText(MultiScreenActivity.this, "当前已是第一屏",300).show();
int a = mulTiViewGroup.getScrollX();
int b = mulTiViewGroup.getScrollY();
mulTiViewGroup.scrollBy(10, 200);
break;
case R.id.bt_scrollRight:
if (curscreen < 2 ){
curscreen ++ ;
Toast.makeText(MultiScreenActivity.this, "第" + (curscreen+1) + "屏", 300).show();
}
else
Toast.makeText(MultiScreenActivity.this, "当前已是最后一屏",300).show();
mulTiViewGroup.scrollTo(curscreen * screenWidth, -30);
break;
}
}
}
|