如果你已经知道include是什么,只是想知道怎么用,使用示例如下:
①布局文件引入layout
1
2
3
4
5
| <include
android:id="@+id/topbar"
android:layout_width="match_parent"
android:layout_height="wrap_content"
layout="@layout/view_topbar" />
|
②Java代码中访问,获取layout中组件,设置属性:
1
2
3
4
5
6
| private View topbar
private TextView txtTitle
topbar = findViewById(R.id.topbar)
txtTitle = (TextView) topbar.findViewById(R.id.txtTitle)
txtTitle.setText("第二页")
|
就这么简单,你可以关页面了,觉得帮助了你,可以点个赞!
如果不知道,想了解相关以及应用场景请继续看:
本节流程图:
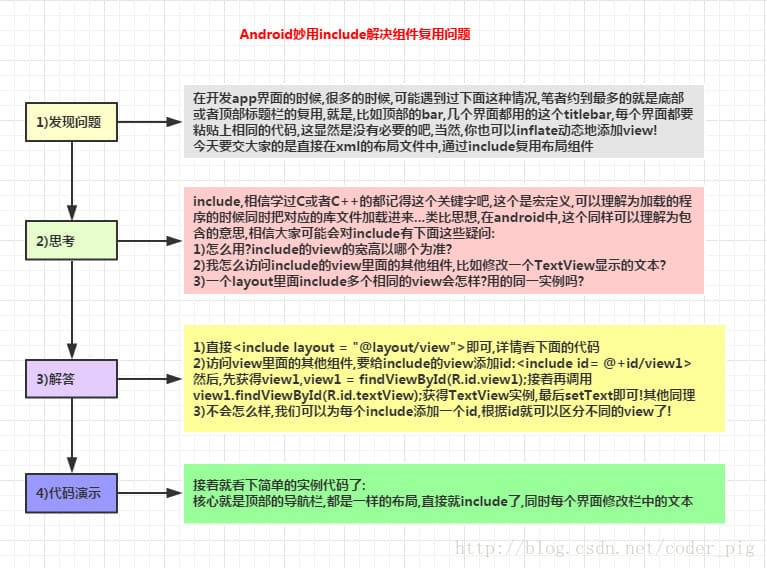
效果图:
代码思路:
核心是顶部的一个titlebar,这里是我们自己写的一个bar,因为后面两个Activity都需要用到,
所以我们直接通过include包含这个bar,然后Java代码中获得该bar实例,再调用bar.findViewById
找到标题栏的TextView修改对应的页面!
详细代码如下:
顶部的bar: view_topbar.xml
1
2
3
4
5
6
7
8
9
10
11
12
13
14
15
16
17
18
19
20
21
22
| <?xml version="1.0" encoding="utf-8"?>
<RelativeLayout xmlns:android="http://schemas.android.com/apk/res/android"
android:layout_width="match_parent"
android:layout_height="match_parent"
android:background="#000000" >
<ImageView
android:id="@+id/imgBack"
android:layout_width="40dp"
android:layout_height="40dp"
android:background="@drawable/back" />
<TextView
android:id="@+id/txtTitle"
android:layout_width="wrap_content"
android:layout_height="wrap_content"
android:layout_centerHorizontal="true"
android:layout_marginTop="8dp"
android:textColor="#FFFFFF"
android:textSize="20sp" />
</RelativeLayout>
|
接着依次编写三个Activity的布局,二三个activity通过include导入topbar
activity_main.xml:
1
2
3
4
5
6
7
8
9
10
11
12
13
14
15
| <RelativeLayout xmlns:android="http://schemas.android.com/apk/res/android"
xmlns:tools="http://schemas.android.com/tools"
android:layout_width="match_parent"
android:layout_height="match_parent"
android:background="#D1E5E6"
tools:context="com.jay.example.includedemo.MainActivity" >
<Button
android:id="@+id/btnTo"
android:layout_width="wrap_content"
android:layout_height="wrap_content"
android:layout_centerInParent="true"
android:text="跳轉到第二個頁面" />
</RelativeLayout>
|
activity_second.xml:
1
2
3
4
5
6
7
8
9
10
11
12
13
14
15
16
17
18
19
20
21
| <RelativeLayout xmlns:android="http://schemas.android.com/apk/res/android"
xmlns:tools="http://schemas.android.com/tools"
android:layout_width="match_parent"
android:layout_height="match_parent"
android:background="#D5E094" >
<include
    android:id="@+id/topbar"
    android:layout_width="match_parent"
    android:layout_height="wrap_content"
    layout="@layout/view_topbar" />
<Button
android:id="@+id/btnTo"
android:layout_width="wrap_content"
android:layout_height="wrap_content"
android:layout_centerInParent="true"
android:text="跳轉到第三個頁面"
android:textSize="14sp" />
</RelativeLayout>
|
activity_third.xml:
1
2
3
4
5
6
7
8
9
10
11
12
13
14
15
16
17
18
19
| <RelativeLayout xmlns:android="http://schemas.android.com/apk/res/android"
xmlns:tools="http://schemas.android.com/tools"
android:layout_width="match_parent"
android:layout_height="match_parent"
android:background="#F2CC9F" >
<include
android:id="@+id/topbar"
android:layout_width="match_parent"
android:layout_height="wrap_content"
layout="@layout/view_topbar" />
<TextView
android:layout_width="wrap_content"
android:layout_height="wrap_content"
android:layout_centerInParent="true"
android:text="第三個頁面" />
</RelativeLayout>
|
编写对应的activity:
MainActivity.java:
1
2
3
4
5
6
7
8
9
10
11
12
13
14
15
16
17
18
19
20
21
22
23
24
25
26
27
28
29
30
31
32
33
34
35
36
37
38
39
40
41
42
43
44
| package com.jay.example.includedemo;
import android.app.Activity;
import android.content.Intent;
import android.os.Bundle;
import android.view.View;
import android.view.View.OnClickListener;
import android.widget.Button;
public class MainActivity extends Activity {
private Button btnTo;
@Override
protected void onCreate(Bundle savedInstanceState) {
super.onCreate(savedInstanceState);
setContentView(R.layout.activity_main);
getViews();
setViews();
}
private void getViews() {
btnTo = (Button) findViewById(R.id.btnTo);
}
private void setViews() {
MyClick myClick = new MyClick();
btnTo.setOnClickListener(myClick);
}
private class MyClick implements OnClickListener {
@Override
public void onClick(View v) {
switch (v.getId()) {
case R.id.btnTo:
Intent it = new Intent(MainActivity.this, SecondActivity.class);
startActivity(it);
break;
}
}
}
}
|
SecondActivity.java:
1
2
3
4
5
6
7
8
9
10
11
12
13
14
15
16
17
18
19
20
21
22
23
24
25
26
27
28
29
30
31
32
33
34
35
36
37
38
39
40
41
42
43
44
45
46
47
48
49
50
51
52
53
54
55
56
57
| package com.jay.example.includedemo;
import android.app.Activity;
import android.content.Intent;
import android.os.Bundle;
import android.view.View;
import android.view.View.OnClickListener;
import android.widget.Button;
import android.widget.ImageView;
import android.widget.TextView;
public class SecondActivity extends Activity {
private View topbar;
private ImageView imgBack;
private TextView txtTitle;
private Button btnTo;
@Override
protected void onCreate(Bundle savedInstanceState) {
super.onCreate(savedInstanceState);
setContentView(R.layout.activity_second);
getActionBar().hide();
getViews();
setViews();
}
private void getViews() {
topbar = findViewById(R.id.topbar);
btnTo = (Button) findViewById(R.id.btnTo);
imgBack = (ImageView) topbar.findViewById(R.id.imgBack);
txtTitle = (TextView) topbar.findViewById(R.id.txtTitle);
}
private void setViews() {
MyClick myClick = new MyClick();
txtTitle.setText("第二页");
btnTo.setOnClickListener(myClick);
imgBack.setOnClickListener(myClick);
}
private class MyClick implements OnClickListener {
@Override
public void onClick(View v) {
switch (v.getId()) {
case R.id.btnTo:
Intent it = new Intent(SecondActivity.this, ThirdActivity.class);
startActivity(it);
break;
case R.id.imgBack:
finish();
break;
}
}
}
}
|
ThirdActivity.java:
1
2
3
4
5
6
7
8
9
10
11
12
13
14
15
16
17
18
19
20
21
22
23
24
25
26
27
28
29
30
31
32
33
34
35
36
37
38
39
40
41
42
43
44
45
46
47
48
| package com.jay.example.includedemo;
import android.app.Activity;
import android.os.Bundle;
import android.view.View;
import android.view.View.OnClickListener;
import android.widget.ImageView;
import android.widget.TextView;
public class ThirdActivity extends Activity {
private View topbar;
private ImageView imgBack;
private TextView txtTitle;
@Override
protected void onCreate(Bundle savedInstanceState) {
super.onCreate(savedInstanceState);
setContentView(R.layout.activity_third);
getActionBar().hide();
getViews();
setViews();
}
private void getViews() {
topbar = findViewById(R.id.topbar);
imgBack = (ImageView) topbar.findViewById(R.id.imgBack);
txtTitle = (TextView) topbar.findViewById(R.id.txtTitle);
}
private void setViews() {
MyClick myClick = new MyClick();
txtTitle.setText("第三页");
imgBack.setOnClickListener(myClick);
}
private class MyClick implements OnClickListener {
@Override
public void onClick(View v) {
switch (v.getId()) {
case R.id.imgBack:
finish();
break;
}
}
}
}
|
最后再配置文件注册下二三两个Activity即可!
1
2
| <activity android:name=".SecondActivity"></activity>
<activity android:name=".ThirdActivity"></activity>
|
代码下载:
http://pan.baidu.com/s/1bnpjJhP