前言:在软件开发的尾声应该都会遇到这个问题,还好网上资料很多,所以基本不费什么力气就搞定了,现记录于下。这里用的PHP服务器。
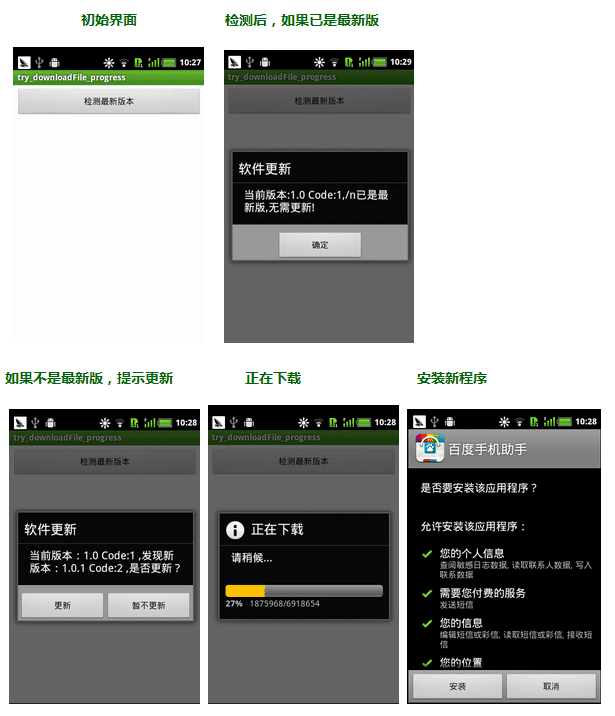
效果图:
一、准备知识
在AndroidManifest.xml里定义了每个Android apk的版本标识:
1
2
3
4
| <manifest xmlns:android="http://schemas.android.com/apk/res/android"
package="com.example.try_downloadfile_progress"
android:versionCode="1"
android:versionName="1.0" >
|
其中,android:versionCode和android:versionName两个字段分别表示版本代码,版本名称。versionCode是整型数字,versionName是字符串。由于version是给用户看的,不太容易比较大小,升级检查时,可以以检查versionCode为主,方便比较出版本的前后大小。
那么,在应用中如何读取AndroidManifest.xml中的versionCode和versionName呢?可以使用PackageManager的API,参考以下代码:
1
2
3
4
5
6
7
8
9
10
11
12
13
14
15
16
17
18
19
20
21
22
23
24
25
26
27
28
29
30
31
32
33
34
|
public static int getVerCode(Context context) {
int verCode = -1;
try {
verCode = context.getPackageManager().getPackageInfo(
"com.example.try_downloadfile_progress", 0).versionCode;
} catch (NameNotFoundException e) {
Log.e("msg", e.getMessage());
}
return verCode;
}
public static String getVerName(Context context) {
String verName = "";
try {
verName = context.getPackageManager().getPackageInfo(
"com.example.try_downloadfile_progress", 0).versionName;
} catch (NameNotFoundException e) {
Log.e("msg", e.getMessage());
}
return verName;
}
|
这里要注意一个地方:代码里的“com.example.try_downloadfile_progress”对应AndroidManifest.xml里的package=”……”部分
二、XML代码
XML代码非常简单,就是如初始化界面那样,在里面加一个BUTTON而已。代码如下:
1
2
3
4
5
6
7
8
9
10
11
12
13
14
| <RelativeLayout xmlns:android="http://schemas.android.com/apk/res/android"
xmlns:tools="http://schemas.android.com/tools"
android:layout_width="fill_parent"
android:layout_height="fill_parent"
tools:context=".MainActivity" >
<Button
android:id="@+id/chek_newest_version"
android:layout_width="fill_parent"
android:layout_height="wrap_content"
android:layout_margin="5dip"
android:text="检测最新版本"/>
</RelativeLayout>
|
三、辅助类构建(Common)
这里为了开发方便,将一些公共的函数,单独放在Common类中实现,代码如下:
1
2
3
4
5
6
7
8
9
10
11
12
13
14
15
16
17
18
19
20
21
22
23
24
25
26
27
28
29
30
31
32
33
34
35
36
37
38
39
40
41
42
43
44
45
46
47
48
49
50
51
52
53
54
55
56
57
58
59
60
61
62
63
64
65
66
67
68
69
70
71
72
73
74
75
76
77
78
79
80
81
82
83
84
85
86
87
88
89
90
91
92
93
94
95
96
97
98
99
100
101
102
103
104
105
106
| package com.example.try_downloadfile_progress;
import java.io.BufferedReader;
import java.io.InputStreamReader;
import java.util.List;
import org.apache.http.HttpResponse;
import org.apache.http.NameValuePair;
import org.apache.http.client.entity.UrlEncodedFormEntity;
import org.apache.http.client.methods.HttpPost;
import org.apache.http.impl.client.DefaultHttpClient;
import org.apache.http.protocol.HTTP;
import android.content.Context;
import android.content.pm.PackageManager.NameNotFoundException;
import android.util.Log;
public class Common {
public static final String SERVER_IP = "http://192.168.1.105/";
public static final String SERVER_ADDRESS = SERVER_IP + "try_downloadFile_progress_server/index.php";
public static final String UPDATESOFTADDRESS = SERVER_IP + "try_downloadFile_progress_server/update_pakage/baidu.apk";
public static StringBuilder post_to_server(List<NameValuePair> vps) {
DefaultHttpClient httpclient = new DefaultHttpClient();
try {
HttpResponse response = null;
HttpPost httpost = new HttpPost(SERVER_ADDRESS);
StringBuilder builder = new StringBuilder();
httpost.setEntity(new UrlEncodedFormEntity(vps, HTTP.UTF_8));
response = httpclient.execute(httpost);
if (response.getEntity() != null) {
BufferedReader reader = new BufferedReader(
new InputStreamReader(response.getEntity().getContent()));
String s = reader.readLine();
for (; s != null; s = reader.readLine()) {
builder.append(s);
}
}
return builder;
} catch (Exception e) {
Log.e("msg", e.getMessage());
return null;
} finally {
try {
httpclient.getConnectionManager().shutdown();
} catch (Exception e) {
Log.e("msg", e.getMessage());
}
}
}
public static int getVerCode(Context context) {
int verCode = -1;
try {
verCode = context.getPackageManager().getPackageInfo(
"com.example.try_downloadfile_progress", 0).versionCode;
} catch (NameNotFoundException e) {
Log.e("msg", e.getMessage());
}
return verCode;
}
public static String getVerName(Context context) {
String verName = "";
try {
verName = context.getPackageManager().getPackageInfo(
"com.example.try_downloadfile_progress", 0).versionName;
} catch (NameNotFoundException e) {
Log.e("msg", e.getMessage());
}
return verName;
}
}
|
这里除了上面我们提到的两个函数getVerCode和getVerName外,还有几个常量和一个函数定义,含义分别如下:
SERVER_IP:服务器IP地址(大家在拿到试验的时候,要改成自己服务器IP地址)
SERVER_ADDRESS:android程序要将请求发送到的页面地址,无须更改。
UPDATESOFTADDRESS:更新安装包存放的位置,无须更改。
函数StringBuilder post_to_server(List vps)是访问服务器并返回结果的功能封装。传进去名值对,返回StringBuilder对象
四、主页面代码构建
1、首先设置AndroidManifest.xml,使其能访问网络和SD卡
在</manifest>标签上面,加入:
1
2
3
| <uses-permission android:name="android.permission.INTERNET" ></uses-permission>
<uses-permission android:name="android.permission.MOUNT_UNMOUNT_FILESYSTEMS" ></uses-permission>
<uses-permission android:name="android.permission.WRITE_EXTERNAL_STORAGE" ></uses-permission>
|
2、主页代码:
先贴出全部代码,然后逐步讲解,全部代码如下:
1
2
3
4
5
6
7
8
9
10
11
12
13
14
15
16
17
18
19
20
21
22
23
24
25
26
27
28
29
30
31
32
33
34
35
36
37
38
39
40
41
42
43
44
45
46
47
48
49
50
51
52
53
54
55
56
57
58
59
60
61
62
63
64
65
66
67
68
69
70
71
72
73
74
75
76
77
78
79
80
81
82
83
84
85
86
87
88
89
90
91
92
93
94
95
96
97
98
99
100
101
102
103
104
105
106
107
108
109
110
111
112
113
114
115
116
117
118
119
120
121
122
123
124
125
126
127
128
129
130
131
132
133
134
135
136
137
138
139
140
141
142
143
144
145
146
147
148
149
150
151
152
153
154
155
156
157
158
159
160
161
162
163
164
165
166
167
168
169
170
171
172
173
174
175
176
177
178
179
180
181
182
183
184
185
186
187
188
189
190
191
192
193
194
195
196
197
198
199
200
201
202
203
204
205
206
207
208
209
210
211
212
213
214
215
216
217
218
219
220
221
222
223
224
225
226
227
228
229
230
231
232
233
234
235
236
237
238
239
240
241
242
243
244
245
246
247
248
249
250
251
252
253
254
255
256
257
258
259
260
261
262
263
264
265
266
| package com.example.try_downloadfile_progress;
import android.app.Activity;
import android.app.AlertDialog;
import android.app.Dialog;
import android.app.ProgressDialog;
import android.content.DialogInterface;
import android.content.Intent;
import android.net.Uri;
import android.os.AsyncTask;
import android.os.Bundle;
import android.os.Environment;
import android.os.Handler;
import android.util.Log;
import android.view.View;
import android.view.View.OnClickListener;
import android.widget.Button;
import com.example.mo.ssy.R;
import org.apache.http.HttpEntity;
import org.apache.http.HttpResponse;
import org.apache.http.NameValuePair;
import org.apache.http.client.ClientProtocolException;
import org.apache.http.client.HttpClient;
import org.apache.http.client.methods.HttpGet;
import org.apache.http.impl.client.DefaultHttpClient;
import org.apache.http.message.BasicNameValuePair;
import org.json.JSONArray;
import java.io.File;
import java.io.FileOutputStream;
import java.io.IOException;
import java.io.InputStream;
import java.util.ArrayList;
import java.util.List;
public class MainActivity extends Activity {
Button m_btnCheckNewestVersion;
long m_newVerCode;
String m_newVerName;
String m_appNameStr;
Handler m_mainHandler;
ProgressDialog m_progressDlg;
@Override
protected void onCreate(Bundle savedInstanceState) {
super.onCreate(savedInstanceState);
setContentView(R.layout.activity_main);
initVariable();
m_btnCheckNewestVersion.setOnClickListener(btnClickListener);
}
private void initVariable() {
m_btnCheckNewestVersion = (Button) findViewById(R.id.chek_newest_version);
m_mainHandler = new Handler();
m_progressDlg = new ProgressDialog(this);
m_progressDlg.setProgressStyle(ProgressDialog.STYLE_HORIZONTAL);
m_progressDlg.setIndeterminate(false);
m_appNameStr = "haha.apk";
}
OnClickListener btnClickListener = new View.OnClickListener() {
@Override
public void onClick(View v) {
new checkNewestVersionAsyncTask().execute();
}
};
class checkNewestVersionAsyncTask extends AsyncTask<Void, Void, Boolean> {
@Override
protected Boolean doInBackground(Void... params) {
if (postCheckNewestVersionCommand2Server()) {
int vercode = Common.getVerCode(getApplicationContext());
if (m_newVerCode > vercode) {
return true;
} else {
return false;
}
}
return false;
}
@Override
protected void onPostExecute(Boolean result) {
if (result) {
doNewVersionUpdate();
} else {
notNewVersionDlgShow();
}
super.onPostExecute(result);
}
@Override
protected void onPreExecute() {
super.onPreExecute();
}
}
private Boolean postCheckNewestVersionCommand2Server() {
StringBuilder builder = new StringBuilder();
JSONArray jsonArray = null;
try {
List<NameValuePair> vps = new ArrayList<NameValuePair>();
vps.add(new BasicNameValuePair("action", "checkNewestVersion"));
builder = Common.post_to_server(vps);
jsonArray = new JSONArray(builder.toString());
if (jsonArray.length() > 0) {
if (jsonArray.getJSONObject(0).getInt("id") == 1) {
m_newVerName = jsonArray.getJSONObject(0).getString("verName");
m_newVerCode = jsonArray.getJSONObject(0).getLong("verCode");
return true;
}
}
return false;
} catch (Exception e) {
Log.e("msg", e.getMessage());
m_newVerName = "";
m_newVerCode = -1;
return false;
}
}
private void doNewVersionUpdate() {
int verCode = Common.getVerCode(getApplicationContext());
String verName = Common.getVerName(getApplicationContext());
String str = "当前版本:" + verName + " Code:" + verCode + " ,发现新版本:" + m_newVerName +
" Code:" + m_newVerCode + " ,是否更新?";
Dialog dialog = new AlertDialog.Builder(this).setTitle("软件更新").setMessage(str)
.setPositiveButton("更新",
new DialogInterface.OnClickListener() {
@Override
public void onClick(DialogInterface dialog,
int which) {
m_progressDlg.setTitle("正在下载");
m_progressDlg.setMessage("请稍候...");
downFile(Common.UPDATESOFTADDRESS);
}
})
.setNegativeButton("暂不更新",
new DialogInterface.OnClickListener() {
public void onClick(DialogInterface dialog,
int whichButton) {
finish();
}
}).create();
dialog.show();
}
private void notNewVersionDlgShow() {
int verCode = Common.getVerCode(this);
String verName = Common.getVerName(this);
String str = "当前版本:" + verName + " Code:" + verCode + ",/n已是最新版,无需更新!";
Dialog dialog = new AlertDialog.Builder(this).setTitle("软件更新")
.setMessage(str)
.setPositiveButton("确定",
new DialogInterface.OnClickListener() {
@Override
public void onClick(DialogInterface dialog,
int which) {
finish();
}
}).create();
dialog.show();
}
private void downFile(final String url) {
m_progressDlg.show();
new Thread() {
public void run() {
HttpClient client = new DefaultHttpClient();
HttpGet get = new HttpGet(url);
HttpResponse response;
try {
response = client.execute(get);
HttpEntity entity = response.getEntity();
long length = entity.getContentLength();
m_progressDlg.setMax((int) length);
InputStream is = entity.getContent();
FileOutputStream fileOutputStream = null;
if (is != null) {
File file = new File(
Environment.getExternalStorageDirectory(),
m_appNameStr);
fileOutputStream = new FileOutputStream(file);
byte[] buf = new byte[1024];
int ch = -1;
int count = 0;
while ((ch = is.read(buf)) != -1) {
fileOutputStream.write(buf, 0, ch);
count += ch;
if (length > 0) {
m_progressDlg.setProgress(count);
}
}
}
fileOutputStream.flush();
if (fileOutputStream != null) {
fileOutputStream.close();
}
down();
} catch (ClientProtocolException e) {
e.printStackTrace();
} catch (IOException e) {
e.printStackTrace();
}
}
}.start();
}
private void down() {
m_mainHandler.post(new Runnable() {
public void run() {
m_progressDlg.cancel();
update();
}
});
}
void update() {
Intent intent = new Intent(Intent.ACTION_VIEW);
intent.setDataAndType(Uri.fromFile(new File(Environment
.getExternalStorageDirectory(), m_appNameStr)),
"application/vnd.android.package-archive");
startActivity(intent);
}
}
|
逐步讲解:
1、OnCreate函数:
先从主函数开始讲,OnCreate函数中只有两部分,一个是initVariable()初始化变量,这个不多说,难度不大;第二个是为版本检测按钮设置监听函数——btnClickListener,而在btnClickListener函数中可以明显的看到,其中也只有一个类checkNewestVersionAsyncTask,这里采用异步方式处理更新问题。下面看checkNewestVersionAsyncTask函数
2、checkNewestVersionAsyncTask函数
1
2
3
4
5
6
7
8
9
10
11
12
13
14
15
16
17
18
19
20
21
22
23
24
25
26
27
28
29
30
31
32
33
| class checkNewestVersionAsyncTask extends AsyncTask<Void, Void, Boolean> {
@Override
protected Boolean doInBackground(Void... params) {
if (postCheckNewestVersionCommand2Server()) {
int vercode = Common.getVerCode(getApplicationContext());
if (m_newVerCode > vercode) {
return true;
} else {
return false;
}
}
return false;
}
@Override
protected void onPostExecute(Boolean result) {
if (result) {
doNewVersionUpdate();
} else {
notNewVersionDlgShow();
}
super.onPostExecute(result);
}
@Override
protected void onPreExecute() {
super.onPreExecute();
}
}
|
(1)首先看后台操作doInBackground
首先利用postCheckNewestVersionCommand2Server()函数将请求发送到服务器,该函数根据是否请求成功返回TRUE或FALSE,然后将从服务器上获取的版本代码与本地的版本代码进行比较,如果要更新返回TRUE,如果不要更新返回FASLE。
下面看看postCheckNewestVersionCommand2Server()的代码:
1
2
3
4
5
6
7
8
9
10
11
12
13
14
15
16
17
18
19
20
21
22
23
24
25
26
27
| private Boolean postCheckNewestVersionCommand2Server() {
StringBuilder builder = new StringBuilder();
JSONArray jsonArray = null;
try {
List<NameValuePair> vps = new ArrayList<NameValuePair>();
vps.add(new BasicNameValuePair("action", "checkNewestVersion"));
builder = Common.post_to_server(vps);
jsonArray = new JSONArray(builder.toString());
if (jsonArray.length() > 0) {
if (jsonArray.getJSONObject(0).getInt("id") == 1) {
m_newVerName = jsonArray.getJSONObject(0).getString("verName");
m_newVerCode = jsonArray.getJSONObject(0).getLong("verCode");
return true;
}
}
return false;
} catch (Exception e) {
Log.e("msg", e.getMessage());
m_newVerName = "";
m_newVerCode = -1;
return false;
}
}
|
这里就是构建名值对,然后发向服务器,如果获取到了值就返回TURE,如果没获取到值,就返回FALSE。服务器返回的JSON值为:
[{"id":"1","verName":"1.0.1","verCode":"2"}]
对于服务器代码,由于是用PHP写的,这里就不再列出了,在源码里有。
(2)onPostExecute()
继续第一部分,在doInBackground操作完成后,如果需要更新doInBackground返回TRUE,否则返回FASLE,所以在onPostExecute中根据result不同调用不同的函数,利用doNewVersionUpdate(); 提示用户更新最新版本。利用notNewVersionDlgShow(); /提示用户当前即为最新版本,无需更新。
对于notNewVersionDlgShow()函数仅仅是创建了个对话框,没什么实体内容,就不再具体讲解。下面具体讲述doNewVersionUpdate()下载,更新与安装程序的过程。
3、doNewVersionUpdate()提示版本更新
具体代码如下:
1
2
3
4
5
6
7
8
9
10
11
12
13
14
15
16
17
18
19
20
21
22
23
24
25
26
27
28
29
| private void doNewVersionUpdate() {
int verCode = Common.getVerCode(getApplicationContext());
String verName = Common.getVerName(getApplicationContext());
String str = "当前版本:" + verName + " Code:" + verCode + " ,发现新版本:" + m_newVerName +
" Code:" + m_newVerCode + " ,是否更新?";
Dialog dialog = new AlertDialog.Builder(this).setTitle("软件更新").setMessage(str)
.setPositiveButton("更新",
new DialogInterface.OnClickListener() {
@Override
public void onClick(DialogInterface dialog,
int which) {
m_progressDlg.setTitle("正在下载");
m_progressDlg.setMessage("请稍候...");
downFile(Common.UPDATESOFTADDRESS);
}
})
.setNegativeButton("暂不更新",
new DialogInterface.OnClickListener() {
public void onClick(DialogInterface dialog,
int whichButton) {
finish();
}
}).create();
dialog.show();
}
|
这里创建一个具有确定按钮和取消按钮功能的对话框,如果用户点击取消按钮,会利用finish()结束掉程序运行;如果点击确定按钮,则利用 downFile(Common.UPDATESOFTADDRESS); 函数开始程序下载,其中downFile()函数传进去的参数是APP所在的服务器地址。注意这里的地址要具体到下载文件,比如这里是http://192.168.1.105/server/XXX.apk
4、downFile(final String url)下载并显示进度
具体代码如下:
1
2
3
4
5
6
7
8
9
10
11
12
13
14
15
16
17
18
19
20
21
22
23
24
25
26
27
28
29
30
31
32
33
34
35
36
37
38
39
40
41
42
43
44
45
| private void downFile(final String url) {
m_progressDlg.show();
new Thread() {
public void run() {
HttpClient client = new DefaultHttpClient();
HttpGet get = new HttpGet(url);
HttpResponse response;
try {
response = client.execute(get);
HttpEntity entity = response.getEntity();
long length = entity.getContentLength();
m_progressDlg.setMax((int) length);
InputStream is = entity.getContent();
FileOutputStream fileOutputStream = null;
if (is != null) {
File file = new File(
Environment.getExternalStorageDirectory(),
m_appNameStr);
fileOutputStream = new FileOutputStream(file);
byte[] buf = new byte[1024];
int ch = -1;
int count = 0;
while ((ch = is.read(buf)) != -1) {
fileOutputStream.write(buf, 0, ch);
count += ch;
if (length > 0) {
m_progressDlg.setProgress(count);
}
}
}
fileOutputStream.flush();
if (fileOutputStream != null) {
fileOutputStream.close();
}
down();
} catch (ClientProtocolException e) {
e.printStackTrace();
} catch (IOException e) {
e.printStackTrace();
}
}
}.start();
}
|
通过利用httpClient的get方法,获取指定URL的内容,然后写到本地SD卡中,对于进度条,首先利用m_progressDlg.setMax((int)length);设置进度条的最大值,然后在读取返回结果并写到本地时,利用 m_progressDlg.setProgress(count);设置当前进度。在全部写完以后,调用down()函数,通知HANDER安装程序。
5、安装程序
安装程序主要利用下面两个函数:
1
2
3
4
5
6
7
8
9
10
11
12
13
14
15
16
17
18
19
20
21
22
|
private void down() {
m_mainHandler.post(new Runnable() {
public void run() {
m_progressDlg.cancel();
update();
}
});
}
void update() {
Intent intent = new Intent(Intent.ACTION_VIEW);
intent.setDataAndType(Uri.fromFile(new File(Environment
.getExternalStorageDirectory(), m_appNameStr)),
"application/vnd.android.package-archive");
startActivity(intent);
}
|
由于在android程序中必须依循单线程操作UI,所以在非主线程中不能操作UI,否则程序会崩掉,具体参见:《AsnyncTask与handler(一)——AsyncTask异步处理》与《AsnyncTask与handler(二)——handler消息机制》。所以这里作用handler的方式更新UI。
好了,到这就全部讲完了,下面给出客户端与服务器端源码,懂PHP的童鞋赚到了有木有……
源码地址:http://download.csdn.net/detail/harvic880925/7309013 不要分,仅供分享。
转载请标明出处:http://blog.csdn.net/harvic880925/article/details/25191159
参考:Android 提示版本更新的实现