自定义滑动指示器

先看效果:

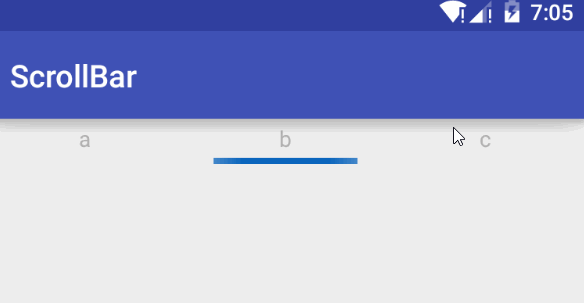
通过自定义view + scrollTo实现。

ScrollLayout.java

1
2
3
4
5
6
7
8
9
10
11
12
13
14
15
16
17
18
19
20
21
22
23
24
25
26
27
28
29
public class ScrollLayout extends LinearLayout{
private Scroller mScroller;

public ScrollLayout(Context context) {
this(context,null);
}

public ScrollLayout(Context context, AttributeSet attrs) {
this(context, attrs, 0);
}

public ScrollLayout(Context context, AttributeSet attrs, int defStyleAttr) {
super(context, attrs, defStyleAttr);
mScroller = new Scroller(context);
}

public void startSrcoll(int startX,int startY,int dx,int dy) {
mScroller.startScroll(startX, startY, dx, dy, 500);//mScroller.startScroll 并不会导致 View 立即进行scroll,它只会导致当前 View 无效,从而重新绘制
invalidate();
}

@Override
public void computeScroll() {
if (mScroller.computeScrollOffset()) {
scrollTo(mScroller.getCurrX(), mScroller.getCurrY());
postInvalidate();
}
}
}

MainActivity.java

1
2
3
4
5
6
7
8
9
10
11
12
13
14
15
16
17
18
19
20
21
22
23
24
25
26
27
28
29
30
31
32
33
34
35
36
37
38
39
40
41
42
43
44
45
46
47
48
49
50
51
public class MainActivity extends AppCompatActivity implements View.OnClickListener {

private RelativeLayout a, b, c;
ImageView sortSelected;
private ScrollLayout mScrollLayout;
int barWidth = 0;
int position = 0;

@Override
protected void onCreate(Bundle savedInstanceState) {
super.onCreate(savedInstanceState);
setContentView(R.layout.activity_main);

WindowManager wm = (WindowManager) this.getSystemService(Context.WINDOW_SERVICE);
int width = wm.getDefaultDisplay().getWidth();
barWidth = width / 3;

mScrollLayout = (ScrollLayout) findViewById(R.id.scroll);
sortSelected = (ImageView) findViewById(R.id.iv_sort_selected);
sortSelected.setLayoutParams(new LinearLayout.LayoutParams(barWidth, 8));

a = (RelativeLayout) findViewById(R.id.a);
b = (RelativeLayout) findViewById(R.id.b);
c = (RelativeLayout) findViewById(R.id.c);
a.setOnClickListener(this);
b.setOnClickListener(this);
c.setOnClickListener(this);

}

@Override
public void onClick(View v) {
int[] location = null;
location = new int[2];
sortSelected.getLocationOnScreen(location);
switch (v.getId()) {
case R.id.a:
mScrollLayout.startSrcoll(-location[0], 0, (position - 0) * barWidth, 0);
position = 0;
break;
case R.id.b:
mScrollLayout.startSrcoll(-location[0], 0, (position - 1) * barWidth, 0);
position = 1;
break;
case R.id.c:
mScrollLayout.startSrcoll(-location[0], 0, (position - 2) * barWidth, 0);
position = 2;
break;
}
}
}

activity_main.xml

1
2
3
4
5
6
7
8
9
10
11
12
13
14
15
16
17
18
19
20
21
22
23
24
25
26
27
28
29
30
31
32
33
34
35
36
37
38
39
40
41
42
43
44
45
46
47
48
49
50
51
52
53
54
55
56
57
58
59
60
61
62
<?xml version="1.0" encoding="utf-8"?>
<RelativeLayout xmlns:android="http://schemas.android.com/apk/res/android"
android:id="@+id/gls_sort_mode"
android:layout_width="match_parent"
android:layout_height="wrap_content">

<LinearLayout
android:id="@+id/ll_sort_layout"
android:layout_width="match_parent"
android:layout_height="wrap_content"
android:orientation="horizontal">

<RelativeLayout
android:id="@+id/a"
style="@style/goods_sort_bg_style">

<TextView
android:id="@+id/tv_sort_price"
style="@style/goods_sort_name_style"
android:text="a" />
</RelativeLayout>


<RelativeLayout
android:id="@+id/b"
style="@style/goods_sort_bg_style">

<TextView
android:id="@+id/tv_sort_sales"
style="@style/goods_sort_name_style"
android:text="b" />
</RelativeLayout>


<RelativeLayout
android:id="@+id/c"
style="@style/goods_sort_bg_style">

<TextView
android:id="@+id/tv_sort_focus"
style="@style/goods_sort_name_style"
android:text="c" />
</RelativeLayout>


</LinearLayout>


<com.example.rex.scrollbar.ScrollLayout
android:id="@+id/scroll"
android:layout_width="match_parent"
android:layout_height="wrap_content"
android:layout_below="@+id/ll_sort_layout">

<ImageView
android:id="@+id/iv_sort_selected"
android:layout_width="wrap_content"
android:layout_height="wrap_content"
android:background="@drawable/goods_sort_selected" />
</com.example.rex.scrollbar.ScrollLayout>

</RelativeLayout>

styles.xml

1
2
3
4
5
6
7
8
9
10
11
12
13
14
15
16
17
18
19
20
21
22
23
24
25
26
<resources>

<!-- Base application theme. -->
<style name="AppTheme" parent="Theme.AppCompat.Light.DarkActionBar">
<!-- Customize your theme here. -->
<item name="colorPrimary">@color/colorPrimary</item>
<item name="colorPrimaryDark">@color/colorPrimaryDark</item>
<item name="colorAccent">@color/colorAccent</item>
</style>

<style name="goods_sort_name_style">
<item name="android:textColor">#b1b0b0</item>
<item name="android:layout_centerInParent">true</item>
<item name="android:layout_width">wrap_content</item>
<item name="android:layout_height">wrap_content</item>
</style>

<style name="goods_sort_bg_style">
<item name="android:clickable">true</item>
<item name="android:layout_weight">1</item>
<item name="android:layout_width">0dip</item>
<item name="android:layout_height">25dp</item>
<item name="android:gravity">center</item>
</style>

</resources>

还有一种方式是通过不断改变之上条距离左边的位置来实现,这种方式只能在viewpager中使用。
打造史上最容易使用的Tab指示符——Indicator
界面切换时指示器跟随滑动-慕课网

扩展阅读:Android Scroller简单用法