ListView与RadioButton组合——自定义单选列表

Android自带的RadioButton单选框只支持添加文字,我们自己写Adapter实现自定义的RadioButton

首先item的XML源码

search_user_item.xml (现在只是文字+单选按钮+自定义背景,可以根据需要随意扩展)

1
2
3
4
5
6
7
8
9
10
11
12
13
14
15
16
17
18
19
20
21
22
23
24
25
26
27
<?xml version="1.0" encoding="utf-8"?>  
<LinearLayout xmlns:android="http://schemas.android.com/apk/res/android"
android:id="@+id/search_user_list_item"
android:layout_width="fill_parent"
android:layout_height="30dp"
android:layout_marginBottom="10dp"
android:layout_marginTop="10dp"
android:background="@drawable/more_item_press"
android:gravity="center_vertical"
android:orientation="horizontal" >

<TextView
android:id="@+id/search_user_name"
android:layout_width="200dp"
android:layout_height="wrap_content"
android:layout_marginLeft="30dp"
android:gravity="left"
android:textColor="@android:color/black"
android:textSize="16sp" />

<RadioButton
android:id="@+id/radio_btn"
android:layout_width="wrap_content"
android:layout_height="wrap_content"
android:layout_marginLeft="10dp" />

</LinearLayout>

Listview就是用系统自带的

1
2
3
4
5
6
7
8
9
10
11
12
<ListView  
android:id="@+id/search_user_list"
android:layout_width="fill_parent"
android:layout_height="200dp"
android:layout_marginLeft="5dp"
android:layout_marginRight="5dp"
android:paddingBottom="5dp"
android:cacheColorHint="@android:color/transparent"
android:divider="@null"
android:listSelector="@android:color/transparent"
android:visibility="gone" >
</ListView>

再来是Adapter代码

SearchUserAdapter.java (具体改动写在代码注释里面)

1
2
3
4
5
6
7
8
9
10
11
12
13
14
15
16
17
18
19
20
21
22
23
24
25
26
27
28
29
30
31
32
33
34
35
36
37
38
39
40
41
42
43
44
45
46
47
48
49
50
51
52
53
54
55
56
57
58
59
60
61
62
63
64
65
66
67
68
69
70
71
72
73
74
75
76
77
78
79
80
81
82
83
84
85
86
87
88
89
90
91
92
93
94
95
96
97
98
99
100
101
102
103
104
105
106
107
108
109
110
111
112
package ouc.sei.suxin.android.ui.adapter;  

import java.util.HashMap;
import java.util.List;

import ouc.sei.suxin.R;
import android.content.Context;
import android.view.LayoutInflater;
import android.view.View;
import android.view.ViewGroup;
import android.widget.BaseAdapter;
import android.widget.LinearLayout;
import android.widget.RadioButton;
import android.widget.TextView;

public class SearchUserAdapter extends BaseAdapter {

private Context context;
private List<String> userList;
HashMap<String,Boolean> states=new HashMap<String,Boolean>();//用于记录每个RadioButton的状态,并保证只可选一个


public SearchUserAdapter(Context context, List<String> userList)
{
this.context = context;
this.userList= userList;
}

@Override
public int getCount() {
return userList.size();
}

@Override
public Object getItem(int position) {
return userList.get(position);
}

@Override
public long getItemId(int position) {
return position;
}

@Override
public View getView(final int position, View convertView, ViewGroup parent) {
ViewHolder holder;
if (convertView == null) {
convertView = LayoutInflater.from(context).inflate(R.layout.search_user_item, null);
holder = new ViewHolder();
holder.background = (LinearLayout) convertView.findViewById(R.id.search_user_list_item);
holder.userName = (TextView) convertView.findViewById(R.id.search_user_name);
convertView.setTag(holder);
}else{
holder=(ViewHolder) convertView.getTag();
}
final RadioButton radio=(RadioButton) convertView.findViewById(R.id.radio_btn);
holder.rdBtn = radio;

holder.userName.setText(userList.get(position));
//根据Item位置分配不同背景
if(userList.size() > 0)
{
if(userList.size() == 1)
{
holder.background.setBackgroundResource(R.drawable.more_item_press);
}
else{
if(position == 0){
holder.background.setBackgroundResource(R.drawable.more_itemtop_press);
}
else if(position == userList.size()-1){
holder.background.setBackgroundResource(R.drawable.more_itembottom_press);
}
else{
holder.background.setBackgroundResource(R.drawable.more_itemmiddle_press);
}
}
}
//当RadioButton被选中时,将其状态记录进States中,并更新其他RadioButton的状态使它们不被选中
holder.rdBtn.setOnClickListener(new View.OnClickListener() {

public void onClick(View v) {

//重置,确保最多只有一项被选中
for(String key:states.keySet()){
states.put(key, false);

}
states.put(String.valueOf(position), radio.isChecked());
SearchUserAdapter.this.notifyDataSetChanged();
}
});

boolean res=false;
if(states.get(String.valueOf(position)) == null || states.get(String.valueOf(position))== false){
res=false;
states.put(String.valueOf(position), false);
}
else
res = true;

holder.rdBtn.setChecked(res);

return convertView;
}

static class ViewHolder {
LinearLayout background;
TextView userName;
RadioButton rdBtn;
}
}

List适配代码(与一般无异):

1
2
3
4
adapter = new SearchUserAdapter(this, searchUserList);  
searchUserLV.setAdapter(adapter);
searchUserLV.setVisibility(View.VISIBLE);
setListViewHeightBasedOnChildren(searchUserLV);

这里还根据内容动态设置了一下,具体函数如下:

1
2
3
4
5
6
7
8
9
10
11
12
13
14
15
16
17
18
19
20
21
22
23
public void setListViewHeightBasedOnChildren(ListView listView) {  

Adapter listAdapter = listView.getAdapter();

if (listAdapter == null) {
return;
}

int totalHeight = 0;
int viewCount = listAdapter.getCount();
for (int i = 0; i < viewCount; i++) {
View listItem = listAdapter.getView(i, null, listView);
listItem.measure(0, 0);
totalHeight += listItem.getMeasuredHeight();
}

ViewGroup.LayoutParams params = listView.getLayoutParams();

params.height = totalHeight
+ (listView.getDividerHeight() * (listAdapter.getCount()-1)) + 10;//加10是为了适配自定义背景

listView.setLayoutParams(params);
}

当需要获取ListView中RadioButton的选择状态时,可以直接看Adapter中的states,具体如下:

1
2
3
4
5
6
7
8
// 根据RadioButton的选择情况确定用户名  
for (int i = 0, j = searchUserLV.getCount(); i < j; i++) {
View child = searchUserLV.getChildAt(i);
RadioButton rdoBtn = (RadioButton) child
.findViewById(R.id.radio_btn);
if (rdoBtn.isChecked())
searchUser = searchUserList.get(i);
}

这里的searchUserList是调用后台服务获取的用户名列表,通过states获取选中用户名进行后续操作
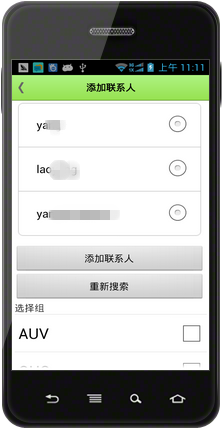
效果图: