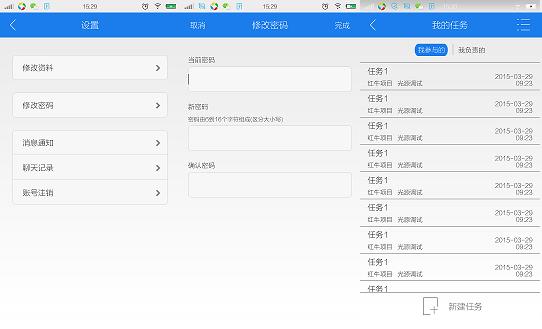
一、 首先,我们看看下面这几张图片,找找其中有什么共同之处?不知道大家有没有发现在这几张图片中,title的位置基本上是一样的,中间的文字在改变,或者是两边的按钮由图片换成了文字。
二、 上面这种情况相信大家在项目中都有遇到,那么遇到这种情况最普遍的写法是什么呢?是不是如下面代码所述的写法?
1.公用title文件e_top_title.xml代码:
1
2
3
4
5
6
7
8
9
10
11
12
13
14
15
16
17
18
19
20
21
22
23
24
25
26
27
28
29
30
31
32
33
34
35
36
37
38
39
40
41
42
43
44
45
46
47
48
49
50
51
52
53
54
55
56
57
58
59
60
61
62
63
64
65
66
67
68
| <?xml version="1.0" encoding="utf-8"?>
<RelativeLayout xmlns:android="http://schemas.android.com/apk/res/android"
android:id="@+id/title_bar"
android:layout_width="match_parent"
android:layout_height="50dp"
android:background="#1A7DEB">
<ImageView
android:id="@+id/title_left_imageview"
android:layout_width="wrap_content"
android:layout_height="wrap_content"
android:layout_centerVertical="true"
android:layout_gravity="center"
android:paddingLeft="20dp"
android:paddingRight="20dp"
android:src="@drawable/layout_top_back"
android:visibility="gone" />
<TextView
android:id="@+id/title_left_textview"
android:layout_width="wrap_content"
android:layout_height="wrap_content"
android:layout_centerVertical="true"
android:paddingLeft="20dp"
android:paddingRight="20dp"
android:text="取消"
android:textColor="#ffffff"
android:textSize="17sp"
android:visibility="gone" />
<TextView
android:visibility="gone"
android:id="@+id/title_middle_textview"
android:layout_width="wrap_content"
android:layout_height="wrap_content"
android:layout_centerInParent="true"
android:maxWidth="224dp"
android:singleLine="true"
android:text="设置"
android:textColor="#ffffff"
android:textSize="20sp"/>
<TextView
android:id="@+id/title_right_textview"
android:layout_width="wrap_content"
android:layout_height="wrap_content"
android:layout_alignParentRight="true"
android:layout_centerVertical="true"
android:paddingLeft="20dp"
android:paddingRight="20dp"
android:text="完成"
android:textColor="#ffffff"
android:textSize="17sp"
android:visibility="gone" />
<ImageView
android:id="@+id/title_right_imageview"
android:layout_width="wrap_content"
android:layout_height="wrap_content"
android:layout_alignParentRight="true"
android:layout_centerVertical="true"
android:layout_gravity="center"
android:paddingLeft="20dp"
android:paddingRight="20dp"
android:src="@drawable/layout_right_menu"
android:visibility="gone" />
</RelativeLayout>
|
2.主配置文件activity_main.xml代码示例:
1
2
3
4
5
6
7
8
9
10
11
12
13
14
15
16
17
18
19
20
21
| <RelativeLayout xmlns:android="http://schemas.android.com/apk/res/android"
xmlns:tools="http://schemas.android.com/tools"
android:layout_width="match_parent"
android:layout_height="match_parent">
<include layout="@layout/e_top_title"/>
<LinearLayout
android:gravity="center"
android:layout_width="match_parent"
android:layout_height="match_parent">
<TextView
android:textSize="20sp"
android:text="Other widget view"
android:layout_width="wrap_content"
android:layout_height="wrap_content" />
</LinearLayout>
</RelativeLayout>
|
3.在主Activity方法中的代码示例:
1
2
3
4
5
6
7
8
9
10
11
12
13
14
15
16
17
18
19
20
21
22
23
24
25
26
27
28
29
30
31
32
33
34
35
36
37
38
39
40
41
42
43
44
45
46
47
48
49
50
51
52
53
54
55
56
57
58
59
60
61
62
63
64
65
66
67
68
69
70
71
72
73
74
75
76
77
78
79
80
81
82
83
84
85
86
87
88
89
90
91
92
93
94
95
96
97
98
99
100
101
102
103
104
105
106
107
108
109
| package com.example.admin.pottingtitle;
import android.support.v7.app.AppCompatActivity;
import android.os.Bundle;
import android.view.View;
import android.widget.ImageView;
import android.widget.TextView;
public class MainActivity extends AppCompatActivity implements View.OnClickListener {
private ImageView title_left_imageview;
private TextView title_left_textview;
private TextView title_middle_textview;
private TextView title_right_textview;
private ImageView title_right_imageview;
@Override
protected void onCreate(Bundle savedInstanceState) {
super.onCreate(savedInstanceState);
setContentView(R.layout.activity_main);
initView();
setIsVisible();
setListener();
}
private void initView()
{
title_left_imageview = (ImageView) findViewById(R.id.title_left_imageview);
title_left_textview = (TextView) findViewById(R.id.title_left_textview);
title_middle_textview = (TextView) findViewById(R.id.title_middle_textview);
title_right_textview = (TextView) findViewById(R.id.title_right_textview);
title_right_imageview = (ImageView) findViewById(R.id.title_right_imageview);
}
private void setIsVisible() {
title_left_imageview.setVisibility(View.VISIBLE);
title_left_imageview.setImageResource(R.drawable.layout_top_back);
title_middle_textview.setText("个人中心");
title_right_imageview.setVisibility(View.VISIBLE);
title_right_imageview.setImageResource(R.drawable.layout_right_menu);
}
private void setListener()
{
title_left_imageview.setOnClickListener(this);
title_left_textview.setOnClickListener(this);
title_right_textview.setOnClickListener(this);
title_right_imageview.setOnClickListener(this);
}
@Override
public void onClick(View v) {
switch (v.getId())
{
case R.id.title_left_imageview:
break;
case R.id.title_left_textview:
break;
case R.id.title_right_textview:
break;
case R.id.title_right_imageview:
break;
}
}
}
|
4.那么在你的代码中是不是这样写的呢?当然不是说这种方法不可以,其实也是可以的,但是若是要你在每个Activity中都把这些代码重新写一遍,你觉得这样好吗?下面利用例子给大家讲解一个封装的方法。
三、title的封装。
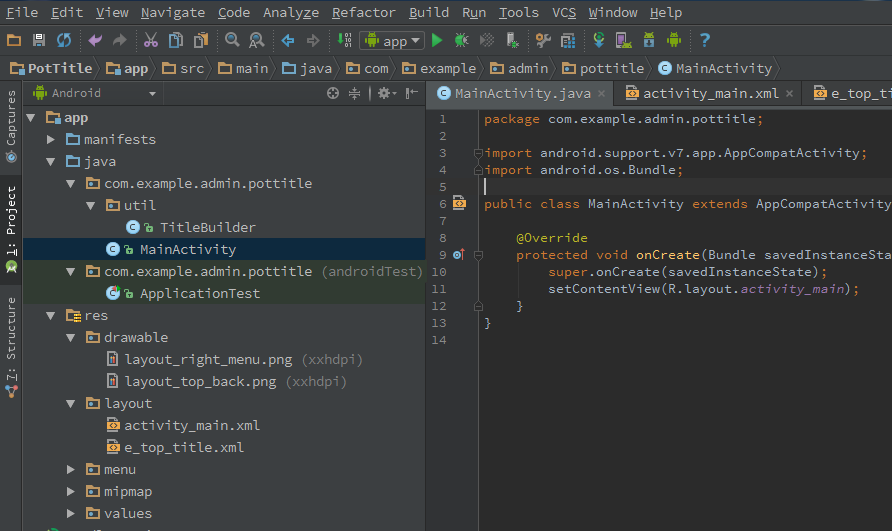
1.在这里我们新建了一个工程,工程的目录结构如下:
2.util包下的TitleBuilder.java类的代码如下:
1
2
3
4
5
6
7
8
9
10
11
12
13
14
15
16
17
18
19
20
21
22
23
24
25
26
27
28
29
30
31
32
33
34
35
36
37
38
39
40
41
42
43
44
45
46
47
48
49
50
51
52
53
54
55
56
57
58
59
60
61
62
63
64
65
66
67
68
69
70
71
72
73
74
75
76
77
78
79
80
81
82
83
84
85
86
87
88
89
90
91
92
93
94
95
96
97
98
99
100
101
102
103
104
105
106
107
108
109
110
111
112
113
114
115
116
117
118
119
120
121
122
123
124
125
126
127
128
129
130
131
132
133
134
135
136
137
138
139
140
141
142
143
144
145
146
147
148
149
150
151
152
153
154
155
156
157
158
159
160
161
162
163
164
165
166
167
168
169
170
171
172
173
174
175
176
177
178
179
180
181
182
183
184
185
186
187
188
189
190
191
192
193
| package com.example.admin.pottitle.util;
import android.app.Activity;
import android.text.TextUtils;
import android.view.View;
import android.widget.ImageView;
import android.widget.TextView;
import com.example.admin.pottitle.R;
public class TitleBuilder {
private View titleView;
private TextView left_textview;
private ImageView left_imageview;
private TextView middle_textview;
private TextView right_textview;
private ImageView right_imageview;
public TitleBuilder(Activity context) {
titleView = context.findViewById(R.id.title_bar);
left_textview = (TextView) titleView.findViewById(R.id.title_left_textview);
left_imageview = (ImageView) titleView.findViewById(R.id.title_left_imageview);
middle_textview = (TextView) titleView.findViewById(R.id.title_middle_textview);
right_textview = (TextView) titleView.findViewById(R.id.title_right_textview);
right_imageview = (ImageView) titleView.findViewById(R.id.title_right_imageview);
}
public TitleBuilder(View context) {
titleView = context.findViewById(R.id.title_bar);
left_textview = (TextView) titleView.findViewById(R.id.title_left_textview);
left_imageview = (ImageView) titleView.findViewById(R.id.title_left_imageview);
middle_textview = (TextView) titleView.findViewById(R.id.title_middle_textview);
right_textview = (TextView) titleView.findViewById(R.id.title_right_textview);
right_imageview = (ImageView) titleView.findViewById(R.id.title_right_imageview);
}
public TitleBuilder setMiddleTitleBgRes(int resid) {
middle_textview.setBackgroundResource(resid);
return this;
}
public TitleBuilder setMiddleTitleText(String text) {
middle_textview.setVisibility(TextUtils.isEmpty(text) ? View.GONE
: View.VISIBLE);
middle_textview.setText(text);
return this;
}
public TitleBuilder setLeftImageRes(int resId) {
left_imageview.setVisibility(resId > 0 ? View.VISIBLE : View.GONE);
left_imageview.setImageResource(resId);
return this;
}
public TitleBuilder setLeftText(String text) {
left_textview.setVisibility(TextUtils.isEmpty(text) ? View.GONE:View.VISIBLE);
left_textview.setText(text);
return this;
}
public TitleBuilder setLeftTextOrImageListener(View.OnClickListener listener) {
if (left_imageview.getVisibility() == View.VISIBLE) {
left_imageview.setOnClickListener(listener);
} else if (left_textview.getVisibility() == View.VISIBLE) {
left_textview.setOnClickListener(listener);
}
return this;
}
public TitleBuilder setRightImageRes(int resId) {
right_imageview.setVisibility(resId > 0 ? View.VISIBLE : View.GONE);
right_imageview.setImageResource(resId);
return this;
}
public TitleBuilder setRightText(String text) {
right_textview.setVisibility(TextUtils.isEmpty(text) ? View.GONE:View.VISIBLE);
right_textview.setText(text);
return this;
}
public TitleBuilder setRightTextOrImageListener(View.OnClickListener listener) {
if (right_imageview.getVisibility() == View.VISIBLE) {
right_imageview.setOnClickListener(listener);
} else if (right_textview.getVisibility() == View.VISIBLE) {
right_textview.setOnClickListener(listener);
}
return this;
}
public View build(){
return titleView;
}
}
|
3.相信看过DialogBuilder类的小伙伴都能看得懂上面的代码,在设置完成后然后返回其本身,这样就可以在用的时候实现一直 “.” 方法然后一直无限设置。
4.在本工程中e_top_title.xml与上面给出的代码一致,因此在这里就不贴出来了。
5.下面来看看在具体代码中的使用:
(1).activity_main.xml中的引用代码如下:
1
2
3
4
5
6
7
8
9
10
11
12
13
14
15
16
17
| <RelativeLayout xmlns:android="http://schemas.android.com/apk/res/android"
xmlns:tools="http://schemas.android.com/tools"
android:layout_width="match_parent"
android:layout_height="match_parent">
<include layout="@layout/e_top_title"></include>
<TextView
android:textSize="20sp"
android:gravity="center"
android:layout_width="match_parent"
android:layout_height="match_parent"
android:text="@string/hello_world" />
</RelativeLayout>
|
(2).在主Activity中的使用方法如下:
1
2
3
4
5
6
7
8
9
10
11
12
13
14
15
16
17
18
19
20
21
22
23
24
25
26
27
28
29
30
31
32
33
34
35
36
37
38
39
40
41
42
43
44
45
46
47
48
49
50
51
52
53
54
55
56
57
58
59
60
61
62
63
64
65
66
67
68
69
70
71
72
73
74
75
76
77
78
| package com.example.admin.pottitle;
import android.support.v7.app.AppCompatActivity;
import android.os.Bundle;
import android.view.View;
import com.example.admin.pottitle.util.TitleBuilder;
public class MainActivity extends AppCompatActivity {
@Override
protected void onCreate(Bundle savedInstanceState) {
super.onCreate(savedInstanceState);
setContentView(R.layout.activity_main);
initTitle();
}
private void initTitle() {
new TitleBuilder(this).setLeftImageRes(R.drawable.layout_top_back)
.setLeftTextOrImageListener(leftCilckListener)
.setMiddleTitleText("个人中心")
.setRightImageRes(R.drawable.layout_right_menu)
.setRightTextOrImageListener(rightCilckListener);
}
private View.OnClickListener leftCilckListener = new View.OnClickListener() {
@Override
public void onClick(View v) {
if (v.getId() == R.id.title_left_imageview)
{
}
else
{
}
}
};
private View.OnClickListener rightCilckListener = new View.OnClickListener() {
@Override
public void onClick(View v) {
if (v.getId() == R.id.title_right_imageview)
{
}
else
{
}
}
};
}
|
(4).怎么样?是不是比刚才那种写法要简便的多,而且代码也比较少,更适用于在每个界面都使用,而且灵活性也大了许多,可能你也许还不理解在TitleBuilder中怎么实现的,那么下面我就讲解一下里面具体的方法。
四、TitleBuilder详解。
1.在上面的代码中可以看到在该类中一共有11个方法,那么在此我只对其中的个别进行解解。
2.初始化方法:
(1).TitleBuilder(Activity context),对控件进行初始化,适用于在主配置文件中直接引用过标题文件的类。
1
2
3
4
5
6
7
8
9
10
11
12
13
14
15
16
17
18
|
public TitleBuilder(Activity context) {
titleView = context.findViewById(R.id.title_bar);
left_textview = (TextView) titleView.findViewById(R.id.title_left_textview);
left_imageview = (ImageView) titleView.findViewById(R.id.title_left_imageview);
middle_textview = (TextView) titleView.findViewById(R.id.title_middle_textview);
right_textview = (TextView) titleView.findViewById(R.id.title_right_textview);
right_imageview = (ImageView) titleView.findViewById(R.id.title_right_imageview);
}
|
(2).TitleBuilder(View context),也会对控件初始化,此方法适用于在代码中构造界面时使用。
1
2
3
4
5
6
7
8
9
10
11
12
13
14
15
16
17
18
|
public TitleBuilder(View context) {
titleView = context.findViewById(R.id.title_bar);
left_textview = (TextView) titleView.findViewById(R.id.title_left_textview);
left_imageview = (ImageView) titleView.findViewById(R.id.title_left_imageview);
middle_textview = (TextView) titleView.findViewById(R.id.title_middle_textview);
right_textview = (TextView) titleView.findViewById(R.id.title_right_textview);
right_imageview = (ImageView) titleView.findViewById(R.id.title_right_imageview);
}
|
3.setMiddleTitleBgRes(int resid)该方法主要用于设置title的背景色。可能每个title的风格相似,当时背景色不一致。
1
2
3
4
5
6
7
8
9
10
|
public TitleBuilder setMiddleTitleBgRes(int resid) {
middle_textview.setBackgroundResource(resid);
return this;
}
|
4.TitleBuilder setMiddleTitleText(String text)设置title中间提示的文字。可以看出来,这里首先进行了非空的判断。
1
2
3
4
5
6
7
8
9
10
11
12
13
14
|
public TitleBuilder setMiddleTitleText(String text) {
middle_textview.setVisibility(TextUtils.isEmpty(text) ? View.GONE
: View.VISIBLE);
middle_textview.setText(text);
return this;
}
|
5.TitleBuilder setLeftImageRes(int resId)设置左边的图片按钮的图片资源信息,在方法中进行了判断,若没有设置则隐藏该控件。
1
2
3
4
5
6
7
8
9
10
11
12
13
14
15
16
|
public TitleBuilder setLeftImageRes(int resId) {
left_imageview.setVisibility(resId > 0 ? View.VISIBLE : View.GONE);
left_imageview.setImageResource(resId);
return this;
}
|
6.TitleBuilder setLeftText(String text)设置左边的文字按钮的信息,若为空的话则隐藏,表示未设置。
1
2
3
4
5
6
7
8
9
10
11
12
13
|
public TitleBuilder setLeftText(String text) {
left_textview.setVisibility(TextUtils.isEmpty(text) ? View.GONE:View.VISIBLE);
left_textview.setText(text);
return this;
}
|
7.TitleBuilder setLeftTextOrImageListener(View.OnClickListener listener)设置左边的事件点击信息,首先判断左边的那个控件是显示状态,然后对其进行事件的绑定。
1
2
3
4
5
6
7
8
9
10
11
12
13
14
15
16
17
|
public TitleBuilder setLeftTextOrImageListener(View.OnClickListener listener) {
if (left_imageview.getVisibility() == View.VISIBLE) {
left_imageview.setOnClickListener(listener);
} else if (left_textview.getVisibility() == View.VISIBLE) {
left_textview.setOnClickListener(listener);
}
return this;
}
|
8.右边的设置跟左边的基本一致,感兴趣的朋友可以再研究下,另外这里类封装的也比较简单,方法比较少,你可以根据自己的需要再添加方法。
资源下载链接如下:源码
转自:http://blog.csdn.net/hxy_blog/article/details/48245227