Laravel Echo 是 5.3 版推出來的新功能。廣播必需透過佇列(queue)的功能,所以在 Window 系統就直接 GG了。這邊我改用 Cloud9 開出 liunx PHP 環境來實驗,如果你有 cloud9 的帳號,可以從這邊直接clone一份 自行研究。Cloud9 的使用可以參考先前文章Cloud9 with Laravel 5.3 ,這次實驗參考了 Introducing Laravel Echo: An In-Depth Walk-Through 文章來跟著作,並記錄一些概念上筆記。
驅動 Laravel Echo 目前支援 pusher, redis, log, null 驅動模式,可以從config/broadcasting.php 去設定,但不建議這樣做,改由定義.env中的BROADCAST_DRIVER等相關的環境變數是會比較好的作法。.env環境變數去設定
這次使用 pusher 的方式,但下面還是會說明一下各驅動差異:
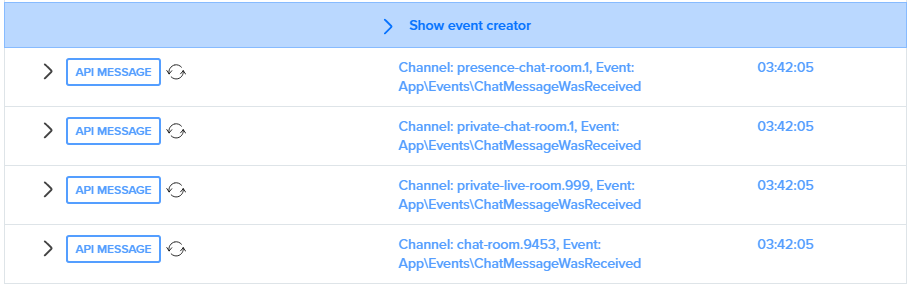
pusher 模式 如果使用的是 pusher 模式,Laravel 會將事件包內容先發送第三方推播服務平台 pusher.com 上,透過 pusher 後台的 Debug Console 可以看見下圖:
而客端程式則透過 laravel-echo 設定 pusher app key 來連線平台,取得平台所發送的事件。(必需先在 pusher.com 申請一個帳號並建立一個 APP)
1
2
3
4
5
var Echo = require ('laravel-echo' );window .Echo = new Echo ({ broadcaster : 'pusher' , key : '244083293b984a086228' });
redis 模式 在使用 redis 模式之前,必需先安裝 redis-server 並啟動,如果使用的是 cloud9 參考Setting Up Redis 。Laravel 將事件包內容寫入至 redis 資料庫,透過 node.js 的 ioredis 捕捉 redis 的 Pub/Sub 事件,然後再用 WebSocket 或 Socket.io 再轉發一次事件至客端。
範例程式:
1 2 3 4 5 6 7 8 9 10 11 12 13 14 15 16 17 18 19 20 21 22 23 24 25 26 27 28 29 30 31 32 33 34 var io = require ('socket.io' )(3000 );var Redis = require ('ioredis' );var redis = new Redis ();redis.subscribe ('chat-room.9453' , function (err, count ) { console .log ('redis connect!' ); }); redis.on ('message' , function (channel, msg ) { console .log ('頻道名稱:' , channel); console .log ('資料內容' , msg); io.emit (msg.event , msg.data ); });
不過這種自刻的簡單 Server,是沒辦法使用下列官方的這個作法
1
2
3
4
5
var EchoSocket = require ('laravel-echo' );window .EchoSocket = new Echo ({ broadcaster : 'socket.io' , host : 'http://127.0.0.1:3000' });
因為並沒有實作對應的 laravel-echo 的函式的處理部分,若要使用的話,可以使用官方建議的 laravel-echo-server 來做 Node.js 的 Echo Server。換句話說,你可以想成laravel-echo-server 就是自架 pusher server 的感覺。
log 模式 如果使用 log 的話,Laravel 僅是將事件包的資料寫入至記錄檔storage/logs/laravel.log 中,內容如下:
1 2 3 4 5 6 7 8 9 10 11 12 13 14 [2016 -09 -06 03 :32 :14 ] local .INFO: Broadcasting [App\Events\ChatMessageWasReceived] on channels [pub-room .9453 , pri-room .1 , pri-room .2 , pre-room .1 ] with payload: { "chatMessage" : { "id" : 25 , "message" : "ABC" , "user_id" : "1" , }, "user" : { "id" : 1 , "name" : "Patrick Stewart" } "socket" : null }
這樣方式通常用於 debug 的時候,檢查伺服發送事件包頻道以及內容是否正確
null 模式 當驅動模式為 null 時,表示關閉廣播功能
事件 在這邊我稱它為事件包(封包),是整個廣播系統的主角。發送到頻道的事件包類別,都必需實作 ShouldBroadcast 介面才行,通常會放至app/Events資料夾(在 v5.3 此資料夾已被移除了,相對的原本在 5.2 中抽象類別 Event 也不存在,若需要再自行建立並繼承)
1 2 3 4 5 class ChatMessageWasReceived implements ShouldBroadcast { use InteractsWithSockets, SerializesModels; public $user; }
所有事件包中的公開屬性,在傳送時將會自動序列化成資料如下
1
2
3
4
5
6
{ "user" : { "id" : 1 , "name" : "Patrick Stewart" } }
但假設你希望的資料是這樣子
1
2
3
4
{ "id" : 1 , "created_at" : "2016-09-05 12:11:10" }
可以透過追加定義 broadcastWith 重新組合的資料格式或追加其它所需資料
1
2
3
4
5
6
7
public function broadcastWith () return [ 'id' => $this->user->name, 'created_at' => date('Y-m-d H:i:s' ) ]; }
而 broadcastOn 定義了當事件被送出時,會發送至哪些頻道上,如果打算一次發送至不同的頻道,可以使用陣列方式回傳如下:
1
2
3
4
5
6
7
8
9
public function broadcastOn { return [ "pub-room.9453" , new PrivateChannel ("pri-room.1" ), new PrivateChannel ("pri-room.2" ), new PresenceChannel ("pre-room.1" ), ]; }
除了事件包外,也可以發送 通知(Notifications) 至頻道中
頻道 Laravel Echo 的頻道有「公開頻道」、「私有頻道」、「既存頻道」三種
公開頻道
所有使用者(包含未登入訪客),都可以接收此頻道事件
客端範例程式:
1 2 3 4 5 6 7 8 9 Echo.channel('chat-room.9453' ) .listen('ChatMessageWasReceived' , function (data ) { console .log ('收到 ChatMessageWasReceived 事件包' ); }) .notification(function (notification ) { console .log ('通知事件' , notification.type); });
私有頻道
接收頻道事件的使用者,需要先驗證(要求登入)
此頻道的使用者不會知道有其它使用者的存在
客端範例程式:
1 2 3 4 5 6 7 8 9 10 Echo.private('live-room.999' ) .listen('ChatMessageWasReceived' , function (data ) { console .log ('收到 ChatMessageWasReceived 事件包' ); console .log ( data.user, data.chatMessage); }) .notification(function (notification ) { console .log ('通知事件' , notification.type); });
既存頻道
接收頻道事件的使用者,需要先驗證(要求登入)
當使用者加入或離開此頻道時,會先觸發 here, joining, leaving 等事件,所以使用者會知道其它使用者的存在
客端範例程式:
1 2 3 4 5 6 7 8 9 10 11 12 13 14 15 16 17 18 19 20 21 22 Echo.join('chat-room.1' ) .here(function (members ) { console .log ('目前此頻道所有使用者有:' ); console .table(members); }) .joining(function (joiningMember, members ) { console .log ('有一位使用者加入了頻道' ) console .table(joiningMember); }) .leaving(function (leavingMember, members ) { console .log ('有一位使用者離開了頻道' ) console .table(leavingMember); }) .listen('ChatMessageWasReceived' , function (data ) { console .log ('收到 ChatMessageWasReceived 事件包' ); console .log ( data.user, data.chatMessage); }) .notification(function (notification ) { console .log ('通知事件' , notification.type); });
驗證 「私有頻道」和「既存頻道」基本都會先檢查使用者是否已經登入,接著若需要進階驗證判斷權限之類(例如某個使用者是否能進入某個聊天室)的,則需要在app/Providers/BroadcastServiceProvider.php 自行定義,記得要先到 config/app.php 啟用(把App\Providers\BroadcastServiceProvider::class, 的註解拿掉)。在這邊不會去定義公開頻道(因為不需要驗證)
1
2
3
4
5
6
7
8
9
10
11
12
13
14
15
16
17
18
19
20
21
22
23
24
25
public function boot() { // 函式實作了 /broadcasting/ auth 的驗證路由 Broadcast::routes(); // ---- 個人私有頻道 ---- Broadcast::channel('App.User.*' , function ($user , $userId ) { return (int) $user ->id === (int) $userId ; }); // 當客端使用 Echo.private('App.User.123' ) 時,若這邊卻沒有設定對應的 // Broadcast::channel('App.User.*' )。即便使用者已經登入,客端那邊也會 // 噴 403 (Forbidden) 錯誤,視同 return false // ---- 既存頻道 - 聊天室 ---- Broadcast::channel('chat-room.*' , function ($user , $chatroomId ) { $userCanEntry = $user ->checkCanEntry($chatroomId );// 是否能進入此聊天室 if (userCanEntry) { return [ 'id' => $user ->id, 'name' => $user ->name, 'age' => $user ->age ]; } else { return false } }); }