引言:
1、phpmyadmin程序所在服务器:192.168.1.1,访问地址为:http://192.168.1.1/phpmyadmin
2、MySQL数据库所在服务器:192.168.1.2,已经允许数据库外链,MySQL数据库用户名:admin 密码:123456
3、现在要通过http://192.168.1.1/phpmyadmin来管理服务器192.168.1.2上面的MySQL数据库
操作如下:
一、下载phpmyadmin到http://192.168.1.1/phpmyadmin目录
下载地址:http://www.phpmyadmin.net/home_page/downloads.php ,找到你需要的版本
例如:http://ncu.dl.sourceforge.net/project/phpmyadmin/phpMyAdmin/3.4.4/phpMyAdmin-3.4.4-all-languages.tar.gz
二、修改phpmyadmin目录中libraries文件夹下的config.default.php文件
1、查找$cfg[‘PmaAbsoluteUri’] ,将其值设置为http://192.168.1.1/phpmyadmin
2、查找$cfg[‘Servers’][$i][‘host’] , 将其值设置为192.168.1.2
3、查找$cfg[‘Servers’][$i][‘user’] , 将其值设置为admin
4、查找$cfg[‘Servers’][$i][‘password’] , 将其值设置为123456
三、配置完成,现在通过http://192.168.1.1/phpmyadmin输入数据库用户名:admin 密码:123456 即可访问服务器192.168.1.2上面的MySQL数据库。
Ubuntu中通过apt install phpmyadmin安装的phpmyadmin,config.default.php在目录/usr/share/phpmyadmin/libraries下,但是按上面的配置修改了没效果,估计要修改的是/etc/phpmyadmin/config.inc.php。
1.在浏览器中输入:http://localhost/phpmyadmin/setup/
2.点击“新建服务器” ,填写表单:
1 | 服务器名称:主机名称 |
3.保存后返回 setup 界面,点击下载,下载的文件为 config.inc.php
4.将下载的文件 config.inc.php 复制到 /usr/share/phpmyadmin/ 目录下
5.编辑 /usr/share/phpmyadmin/config.inc.php
添加以下代码
1 | /* Server: localhost [1] */ |
修改phpMyAdmin/libraries/config.default.php
修改配置文件前,最好先备份一下,万一改错地方了,显示不了,就郁闷了。
1 | /** |
修改前,登录界面上服务器IP输入框是不存在的,变成true后就显示了,就可以连接多个不同的数据库了。但是这样修改有一个缺点,如果在多个数据库之间切换,要先退出,重新登录。
如果要同时管理多个mysql服务器。
1.将phpMyAdmin根目录下的config.sample.inc.php,重命名为config.inc.php
2.修改config.inc.php文件
1 | /* |
注意一点,数组下标不要从0开始,不然会提示错误的,无效的服务器索引:“0”
登录前,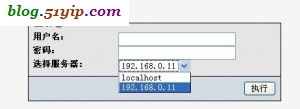
登录后,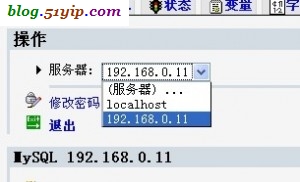
有一点要注意,用localhost登录后,选择上图下拉中的192.168.0.11后,还会让你登录,都登录后,在多个服务器这间切换就不要在登录了。