Kotlin 中的 let, with, run, apply, also 等函数的使用

前言

和严格古老的 Java 相比,Kotlin 中额外提供了不少高级语法特性。
这些高级特性中,定义于 Kotlin 的 Standard.kt
为我们提供了一些内置拓展函数以方便我们写出更优雅的代码。

相比大多数人都用过 let 函数来做过 Null Check,和 let 函数一样,with, run, apply, also 都可以提供非常强大的功能用以优化代码。

let

当需要定义一个变量在一个特定的作用域时,可以考虑使用 let 函数。当然,更多的是用于避免 Null 判断。

在 let 函数内部,用 it 指代调用 let 函数的对象,并且最后返回最后的计算值

一般结构

1
2
3
4
5
6
7
8
9
10
11
any.let {
// 用 it 指代 any 对象
// todo() 是 any 对象的共有属性或方法
// it.todo() 的返回值作为 let 函数的返回值返回
it.todo()
}

// 另一种用法
any?.let {
it.todo() // any 不为 null 时才会调用 let 函数
}

具体使用

1
2
3
4
5
6
7
fun main() {
val result = "Test".let {
println(it) // Test
3 * 4 // result = 12
}
println(result) // 12
}

对应到实际使用场景一般是 需要对一个可能为 null 的对象多次做空判断:

1
2
3
textView?.text = "TextSetInTextView"
textView?.setTextColor(ContextCompat.getColor(this, R.color.colorAccent))
textView?.textSize = 18f

使用 let 函数优化后:

1
2
3
4
5
textView?.let { 
it.text = "TextSetInTextView"
it.setTextColor(ContextCompat.getColor(this, R.color.colorAccent))
it.textSize = 18f
}

with

和 let 类似,又和 let 不同,with 最后也包含一段函数块,也是将最后的计算的结果返回。

但是 with 不是以拓展的形式存在的。其将某个对象作为函数的参数,并且以 this 指代。

首先来看 with 的一般结构:

一般结构

1
2
3
4
5
whith(any) {
// todo() 是 any 对象的共有属性或方法
// todo() 的返回值作为 with 函数的返回值返回
todo()
}

其实 with 函数的原始写法应该是:

1
2
3
with(any, {
todo()
})

有用过 Groove DSL 的同学一定都知道在 Groovy 中,函数调用的最后一个参数是函数的话,函数的大括号可以提到圆括号() 的外面。

巧了,Kotlin DSL 也支持,所以最终就变成了一般结构中的那种写法了。

没错,Kotlin 也是支持 DSL 的,Android 使用 Gradle 进行编译,build.gradle 使用 Groovy 进行编写。

如果你对 Groovy 不太熟悉的话,也可以使用 Kotlin DSL 来写 build.gradle.kts

具体使用

1
2
3
4
5
6
7
8
9
10
class Person(val name: String, val age: Int)

fun main() {
val chengww = Person("chengww", 18)
val result = with(chengww) {
println("Greetings. My name is $name, I am $age years old.")
3 * 4 // result = 12
}
println(result)
}

在 let 函数的实际使用中,我们对 textView 进行空判断,但是每次函数调用的时候还是要使用 it 对象去调用。

如果我们使用 with 函数的话,由于代码块中传入的是 this,而不是 it,那么我们就可以直接写出函数名(属性)来进行相应的设置:

1
2
3
4
5
6
if (textView == null) return
with(textView) {
text = "TextSetInTextView"
setTextColor(ContextCompat.getColor(this@TestActivity, R.color.colorAccent))
textSize = 18f
}

这段代码唯一的缺点就是要事先判空了,有没有既能像 let 那样能优雅的判空,又能写出这样的便利的代码呢?

别着急,咱们接着往下看。

run

刚刚说到,我们想能有 let 函数那样又优雅的判空,又能有 with 函数省去同一个对象多次设置属性的便捷写法。

没错,就是这就非我们 run 函数莫属了。run 函数基本是 let 和 with 的结合体,对象调用 run 函数,接收一个 lambda 函数为参数,传入 this 并以闭包形式返回,返回值是最后的计算结果。

一般结构

1
2
3
4
5
any.run {
// todo() 是 any 对象的共有属性或方法
// todo() 的返回值作为 run 函数的返回值返回
todo()
}

那么上面 TextView 设置各种属性的优化写法就是这样的:

1
2
3
4
5
textView?.run {
text = "TextSetInTextView"
setTextColor(ContextCompat.getColor(this@TestActivity, R.color.colorAccent))
textSize = 18f
}

像上面这个例子,在需要多次设置属性,但设置属性后返回值不是改对象(或无返回值:Unit)不能链式调用的时候,就非常适合使用 run 函数。

apply

apply 函数和 run 函数很像,但是 apply 最后返回的是调用对象自身。

一般结构

1
2
3
4
5
6
7
val result = any.apply {
// todo() 是 any 对象的共有属性或方法
todo()
3 * 4 // 最后返回的是 any 对象,而不是 12
}

println(result) // 打印的是 any 对象

由于 apply 函数返回的是调用对象自身,我们可以借助 apply 函数的特性进行多级判空。

具体使用

在 Java 中多级判空一直是老大难的问题:

下面是一个 School 类中包含内部类 Class,在 Class 又包含内部类 Student,我们想获取该 Student 的 name 属性的示例。

这其中包含对 className 的修改操作。

1
2
3
4
5
6
7
8
9
10
11
12
13
14
15
16
17
18
19
20
21
22
23
24
25
26
27
28
29
30
31
32
public class Main {
public static void main(String[] args) {
School school = init();
// To change the className of the a student and get his(her) name in this school what we should do in Java
if (school != null && school.mClass != null) {
school.mClass.className = "Class 1";
System.out.println("Class name has been changed as Class 1.");
if (school.mClass.student != null) {
System.out.println("The student's name is " + school.mClass.student.name);
}
}
}

static School init() {
School school = new School();
school.mClass = new School.Class();
school.mClass.student = new School.Class.Student();
school.mClass.student.name = "chengww";
return school;
}

static class School {
Class mClass;
private static class Class {
String className;
Student student;
private static class Student {
String name;
}
}
}
}

实际情况中可能会有更多的判空层级,如果我们用 Kotlin 的 apply 函数来操作又会是怎么样呢?

1
2
3
4
5
6
7
8
9
10
11
12
13
14
15
16
fun main() {
val school = init()
school?.mClass?.apply {
className = "Class 1"
println("Class name has been changed as Class 1.")
}?.student?.name?.also { println("The student's name is $it.") }
}

fun init(): School = School(School.Class(School.Class.Student("chengww")))


class School(var mClass: Class? = null) {
class Class(var student: Student? = null, var className: String? = null) {
class Student(var name: String? = null)
}
}

also

有没有注意到上面的示例中,我们最后打印该学生的名字的时候,调用了 also 函数。

没错,和 let 函数类似,唯一的区别就是 also 函数的返回值是调用对象本身,在上例中 also 函数将返回 school.mClass.student.name

一般结构

1
2
3
4
5
6
val result = any.also {
// 用 it 指代 any 对象
// todo() 是 any 对象的共有属性或方法
it.todo()
3 * 4 // 将返回 any 对象,而不是 12
}

总结

函数定义见下表:

函数名 实现
let public inline fun <T, R> T.let(block: (T) -> R): R = block(this)
with public inline fun <T, R> with(receiver: T, block: T.() -> R): R = receiver.block()
run public inline fun <T, R> T.run(block: T.() -> R): R = block()
apply public inline fun T.apply(block: T.() -> Unit): T { block(); return this }
also public inline fun T.also(block: (T) -> Unit): T { block(this); return this }
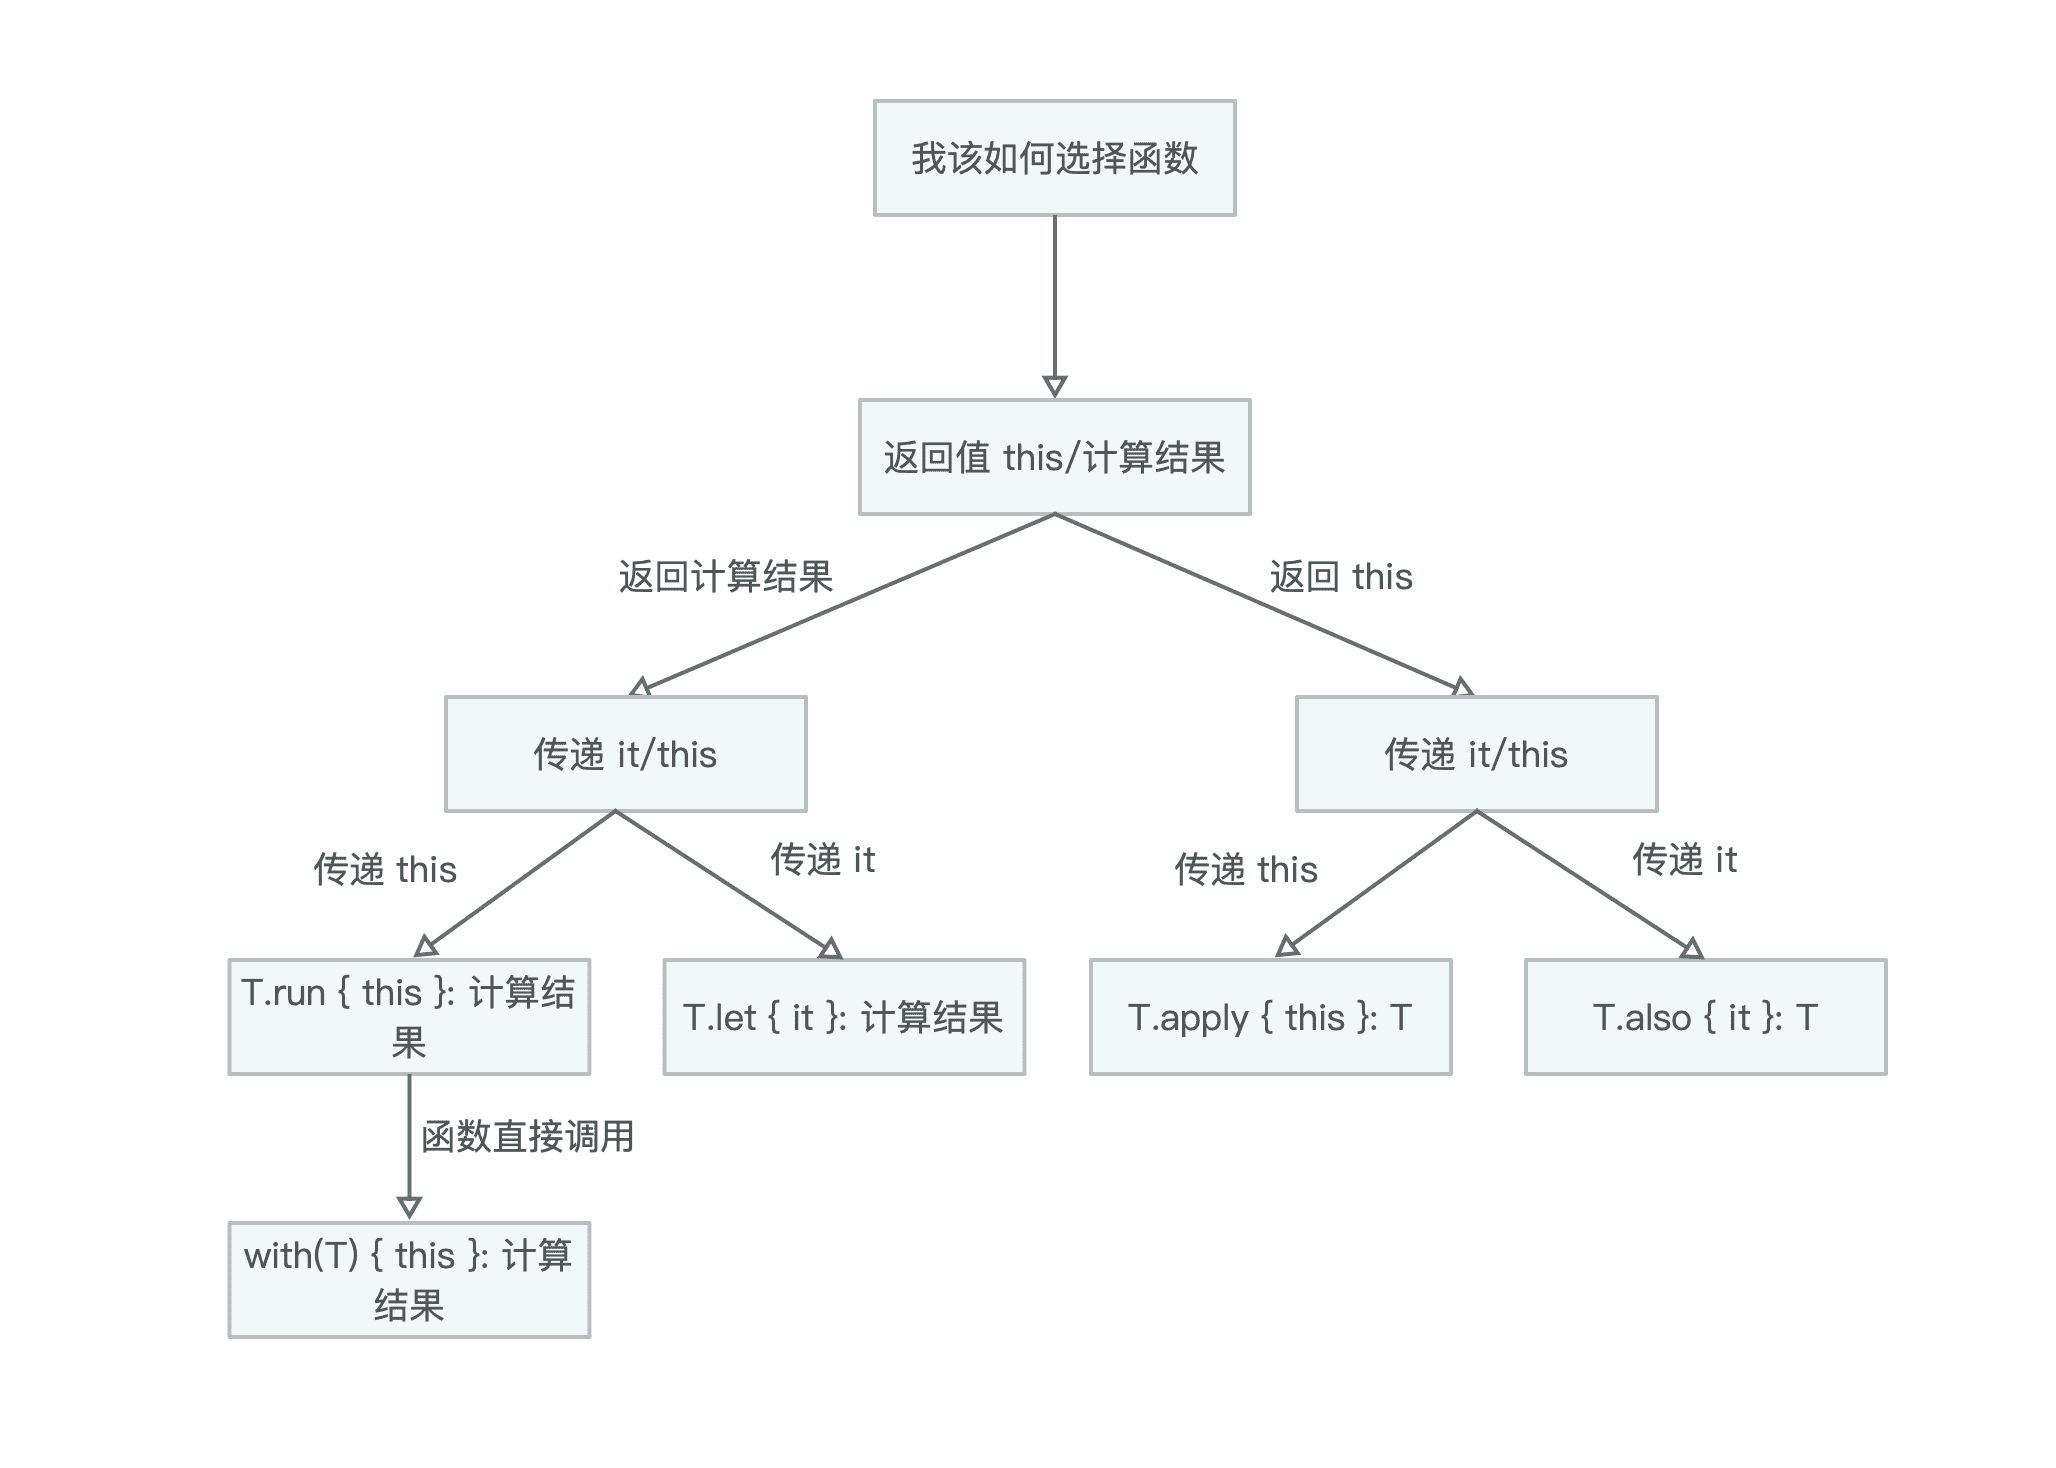
具体的调用情况见下图: