SimpleAdapter是扩展性最好的适配器,可以定义各种你想要的布局,而且使用很方便
SimpleAdapter(Context context, List<? extends Map<String, ?>> data, int resource, String[] from, int[] to)
参数context:上下文,比如this。关联SimpleAdapter运行的视图上下文
参数data:Map列表,列表要显示的数据,这部分需要自己实现,如例子中的getData(),类型要与上面的一致,每条项目要与from中指定条目一致
参数resource:ListView单项布局文件的Id,这个布局就是你自定义的布局了,你想显示什么样子的布局都在这个布局中。这个布局中必须包括了to中定义的控件id
参数 from:一个被添加到Map上关联每一个项目列名称的列表,数组里面是列名称
参数 to:是一个int数组,数组里面的id是自定义布局中各个控件的id,需要与上面的from对应
SimpleAdapter可以使用自定义的ListView,然后setContentView即可。也可以直接使用系统自带的ListAcitivity,该ListActivity实现了ListView,显示ListView的时候做了很多优化。
ListActivity直接extends ListActivity即可,不需要在setContentView了
例子一:自定义布局,显示本地资源
如果直接继承ListAcitivty,则不需要自定义ListView,下面的是列表项单项显示格式
1
2
3
4
5
6
7
8
9
10
11
12
13
14
15
16
17
18
19
20
21
22
23
24
25
26
27
28
29
30
31
32
| <?xml version="1.0" encoding="utf-8"?>
<LinearLayout xmlns:android="http://schemas.android.com/apk/res/android"
android:layout_width="fill_parent"
android:layout_height="fill_parent"
android:orientation="horizontal" >
<ImageView
android:id="@+id/img"
android:layout_width="wrap_content"
android:layout_height="wrap_content"
android:layout_margin="3px"
/>
<LinearLayout
android:layout_width="fill_parent"
android:layout_height="wrap_content"
android:orientation="vertical"
>
<TextView
android:id="@+id/title"
android:layout_width="fill_parent"
android:layout_height="wrap_content"
android:textSize="16sp"
/>
<TextView
android:id="@+id/info"
android:layout_width="fill_parent"
android:layout_height="wrap_content"
android:textSize="10sp"
/>
</LinearLayout>
</LinearLayout>
|
Activity
1
2
3
4
5
6
7
8
9
10
11
12
13
14
15
16
17
18
19
20
21
22
23
24
25
26
27
28
29
30
31
32
33
34
35
36
37
38
39
40
41
42
43
44
45
46
47
48
49
50
51
52
53
54
55
56
57
58
59
60
61
62
63
| package com.loulijun.demo13;
import java.util.ArrayList;
import java.util.HashMap;
import java.util.List;
import java.util.Map;
import android.app.ListActivity;
import android.os.Bundle;
import android.widget.SimpleAdapter;
public class Demo13Activity extends ListActivity {
@Override
public void onCreate(Bundle savedInstanceState) {
super.onCreate(savedInstanceState);
SimpleAdapter adapter = new SimpleAdapter(this, getData(),
R.layout.main, new String[] { "img", "title", "info" },
new int[] { R.id.img, R.id.title, R.id.info });
setListAdapter(adapter);
}
private List<Map<String, Object>> getData() {
List<Map<String, Object>> list = new ArrayList<Map<String, Object>>();
Map<String, Object> map = new HashMap<String, Object>();
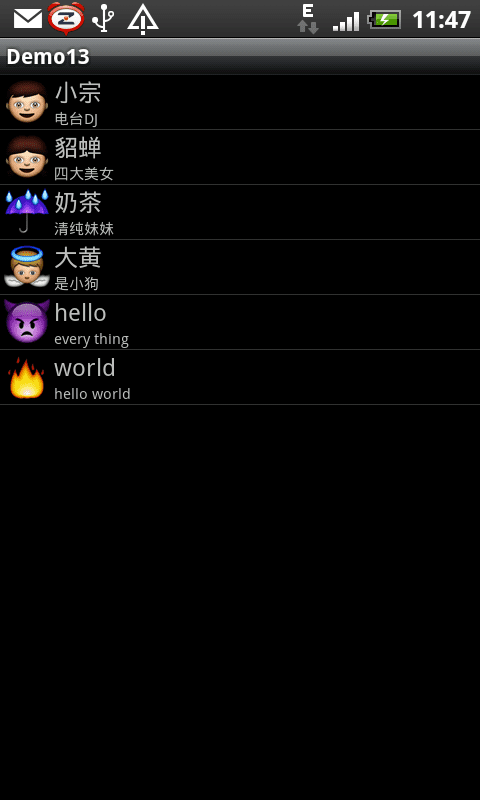
map.put("img", R.drawable.e001);
map.put("title", "小宗");
map.put("info", "电台DJ");
list.add(map);
map = new HashMap<String, Object>();
map.put("img", R.drawable.e002);
map.put("title", "貂蝉");
map.put("info", "四大美女");
list.add(map);
map = new HashMap<String, Object>();
map.put("img", R.drawable.e04b);
map.put("title", "奶茶");
map.put("info", "清纯妹妹");
list.add(map);
map = new HashMap<String, Object>();
map.put("img", R.drawable.e04e);
map.put("title", "大黄");
map.put("info", "是小狗");
list.add(map);
map = new HashMap<String, Object>();
map.put("img", R.drawable.e11a);
map.put("title", "hello");
map.put("info", "every thing");
list.add(map);
map = new HashMap<String, Object>();
map.put("img", R.drawable.e11d);
map.put("title", "world");
map.put("info", "hello world");
list.add(map);
return list;
}
}
|
|——————————华丽的分割线——————————————|
注:自定义ListView也有其好处,因为继承的ListAcitivity布局的样子已经定了下来,但是如果我们需要在ListView中实现某些效果,比如快速滚动条,就需要自定义了。
另外如果你继承的比如是TabActivity等其他Acitivty的话,就不能继承ListAcitivty了,因为JAVA是单继承,这时候还是需要自定义的ListView
如果自定义ListView而不是继承ListActivity需要如下样子实现
mylist.xml,在ListView中可以定义其他属性
1
2
3
4
5
6
7
8
9
10
11
12
13
| <?xml version="1.0" encoding="utf-8"?>
<LinearLayout xmlns:android="http://schemas.android.com/apk/res/android"
android:layout_width="match_parent"
android:layout_height="match_parent"
android:orientation="vertical" >
<ListView
android:id="@+id/listview"
android:layout_width="fill_parent"
android:layout_height="wrap_content"
></ListView>
</LinearLayout>
|
如果使用自定义的ListView就需要在上面的代码修改一下下了
1
2
3
4
5
6
7
8
9
10
11
12
13
| public class Demo13Activity extends Activity {
private ListView lv;
@Override
public void onCreate(Bundle savedInstanceState) {
super.onCreate(savedInstanceState);
setContentView(R.layout.mylist);
lv = (ListView)findViewById(R.id.listview);
SimpleAdapter adapter = new SimpleAdapter(this, getData(),
R.layout.main, new String[] { "img", "title", "info" },
new int[] { R.id.img, R.id.title, R.id.info });
lv.setAdapter(adapter);
}
|
运行效果如下:
|————————————————————————|
用户可以自定义布局,可以是线性布局,也可以是网格布局等等
接下来说说ViewBinder的使用,上面的例子中我们显示了本地资源,图片都是保存在本地的,但是用上面的方法显示网络上获取的图片却有问题,因为如果ListView要显示外部资源的话必须要设置ViewBinder,通过ViewBinder的绑定机制来显示网络资源,下面是个显示网络图片的例子(如果可能的话,最好还是使用BaseAdapter)
例子二:自定义布局,显示网络资源,ViewBinder的使用
由于需要访问网络资源,首先在你的清单文件中加入权限
<uses-permission android:name="android.permission.INTERNET"/>
其他布局跟上面一样
1
2
3
4
5
6
7
8
9
10
11
12
13
14
15
16
17
18
19
20
21
22
23
24
25
26
27
28
29
30
31
32
33
34
35
36
37
38
39
40
41
42
43
44
45
46
47
48
49
50
51
52
53
54
55
56
57
58
59
60
61
62
63
64
65
66
67
68
69
70
71
72
73
74
75
76
77
78
79
80
81
82
83
84
85
86
87
88
89
90
91
92
93
94
95
96
97
98
99
100
101
102
| package com.loulijun.demo13;
import java.io.InputStream;
import java.net.HttpURLConnection;
import java.net.MalformedURLException;
import java.net.URL;
import java.util.ArrayList;
import java.util.HashMap;
import java.util.List;
import java.util.Map;
import android.app.Activity;
import android.graphics.Bitmap;
import android.graphics.BitmapFactory;
import android.os.Bundle;
import android.view.View;
import android.widget.ImageView;
import android.widget.ListView;
import android.widget.SimpleAdapter;
import android.widget.SimpleAdapter.ViewBinder;
public class Demo13Activity extends Activity {
private ListView lv;
private static final String iphoneUrl = "http://www.51aigoo.com/images/20100107/6b21df8c2419480e.jpg";
private static final String macbookproUrl = "http://www.esundigi.net/images/goods/20110317/6ece8f319694f0b1.jpg";
@Override
public void onCreate(Bundle savedInstanceState) {
super.onCreate(savedInstanceState);
setContentView(R.layout.mylist);
lv = (ListView)findViewById(R.id.listview);
SimpleAdapter adapter = new SimpleAdapter(
this,
getData(),
R.layout.main,
new String[] {"img","title","info"},
new int[] { R.id.img, R.id.title, R.id.info});
adapter.setViewBinder(new MyViewBinder());
lv.setAdapter(adapter);
}
public Bitmap getBitmap(String httpUrl)
{
Bitmap bmp = null;
try {
URL url = new URL(httpUrl);
HttpURLConnection conn = (HttpURLConnection)url.openConnection();
InputStream is = conn.getInputStream();
bmp = BitmapFactory.decodeStream(is);
} catch (Exception e) {
e.printStackTrace();
}
return bmp;
}
private List<Map<String, Object>> getData() {
List<Map<String, Object>> list = new ArrayList<Map<String, Object>>();
Map<String, Object> map = new HashMap<String, Object>();
map.put("img", getBitmap(iphoneUrl));
map.put("title", "iphone4");
map.put("info", "可远观而买不起嫣");
list.add(map);
map = new HashMap<String, Object>();
map.put("img", getBitmap(macbookproUrl));
map.put("title", "Macbook pro");
map.put("info", "明年买个玩玩");
list.add(map);
return list;
}
}
class MyViewBinder implements ViewBinder
{
@Override
public boolean setViewValue(View view, Object data,
String textRepresentation) {
if((view instanceof ImageView)&(data instanceof Bitmap))
{
ImageView iv = (ImageView)view;
Bitmap bmp = (Bitmap)data;
iv.setImageBitmap(bmp);
return true;
}
return false;
}
}
|
运行结果:

文章精选:
农民伯伯:http://www.cnblogs.com/over140/archive/2010/11/24/1886151.html
http://www.cnblogs.com/over140/archive/2010/12/15/1906303.html
ViewBinder解决方案:http://www.anddev.org/listview_simpleadapter_and_bitmaps_-_bug_-t11817.html
ListView中的每个子项是:
1
2
3
4
5
6
7
8
9
10
| <?xml version="1.0" encoding="utf-8"?>
<LinearLayout
xmlns:android="http://schemas.android.com/apk/res/android"
android:layout_width="fill_parent"
android:layout_height="fill_parent">
<ImageView
android:id="@+id/item_bg"
android:layout_width="wrap_content"
android:layout_height="wrap_content" />
</LinearLayout>
|
如果使用的是自定义的Adapter,那么onItemClick(AdapterView<?> parent, View view, final int postion, long id)中,可以这么通过第三个参数view取得子项:
1
2
3
4
5
|
ViewHolder holder = (ViewHolder) view.getTag();
holder.fl_ivew.setVisibility(View.INVISIBLE);
View itemView = listview.getChildAt(position);
|
如果使用的是SimpleAdapter,此时不存在ViewHolder,则可以这么取:
1
2
3
4
5
6
7
| listview.setOnItemClickListener(new AdapterView.OnItemClickListener() {
@Override
public void onItemClick(AdapterView<?> parent, View view, final int postion, long id) {
LinearLayout linearLayout = (LinearLayout) view;
final ImageView img = (ImageView) linearLayout.getChildAt(0);
}
});
|